System preferences and engineering options
| Language: | English • magyar |
|---|
Every setting of Siwenoid V2 can be found in the Preferences options in the File menu.
- The menu items (and their submenus) can be accessed with the corresponding permissions
This part is mainly for the engineers who are activating and configuring the system but some of the segments are for the end-users comfort.
We can access the preferences by clicking on the FILE menu / SETTINGS where we can see the categories of the options.
Three navigation button helps us to find our way around in the menu.
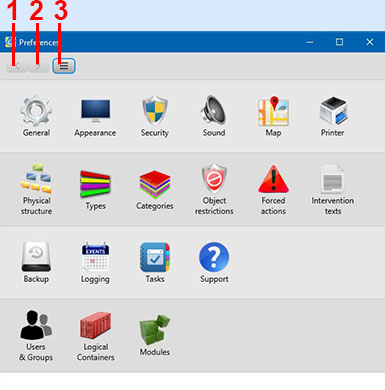
1) Opens the previous window we used.
2) Opens the next window.
3) Jumps to home screen of settings (as seen on the picture).
- ' Siwenoid can be configured during operation without loosing functionality.
General Settings
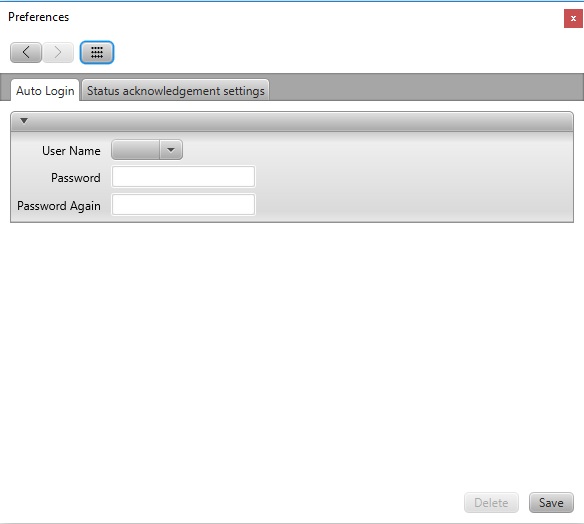
Setup Auto Login
In general settings we can setup automatic login. On a Siwenoid client we can setup a user what will automatically log in on system starting so we can skip the login screen.
- If the client is used on a specific workplace (for example a dispatcher room) and there is 1 user for the security guards we can make their life easier.
On system startup the softwer will skip the login screen and will automatically log in the setupped user.
- If we want to use a different user (for example administrator) then we can do this by selecting "SWITCH USER" from the FILE menu.
- It is wise not to setup an Administrator user for auto login.
- The password set here also have 1024bit encryption.
Status acknowledgement setting
On multiple client configuration we can setup how the acknowledgement of the incoming alerts/signals should be done:
- Acknowledge by clients: If a signal is acknowledged on one client then on the other client it is shown as an acknowledged signal (inverted background). No client can miss any signaling.
- User synchronized acknowledge: If there are multiple clients using the same username and password then any acknowledgement will shown synchronized on every client using the same user.
- Synchronized acknowledgement: Every client every user sees the same signal log.
Appearance settings
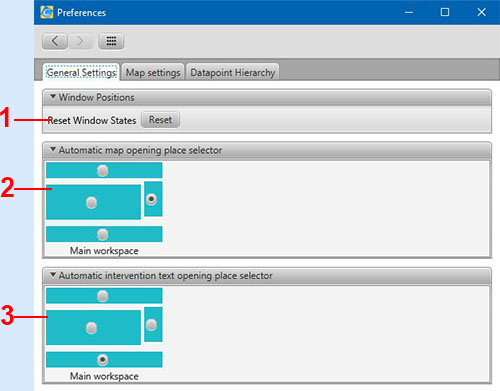
1) Reset window states: By pressing the button "reset" we can set all opened windows' position to default.
- It is useful (for example) when we used multiple monitor configuration before and now we cannot find some of our windows on the screen. On click on the reset button will solve this.
2) Automatic map opening selector: Here we can select that which workplace of the screen should the automatic map opening use to display maps. (The workplace of the main screen)
3) Automatic Intervention text opening place selector: Here we can select that which workplace of the screen should the automatic map opening use to display maps. (The workplace of the main screen)
Map settings tab
Here we can select the contents of the tooltip on datapoints represented on maps.
- Check every item we would like to see as a tooltip while hovering the mouse cursor on the maps' datapoints.
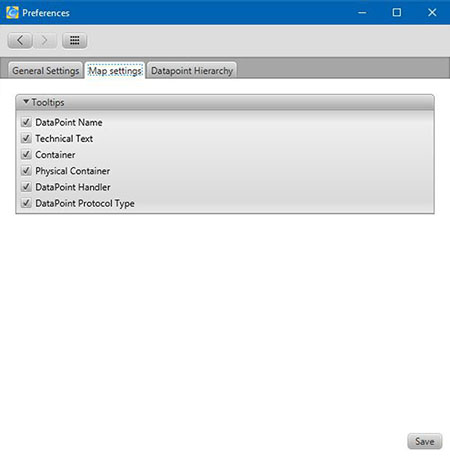
Don't forget to save the changes we made by clicking on the button SAVE.
Datapoint hierarchy tab
Here we can change the settings of the Datapoint Hierarchy text lines.
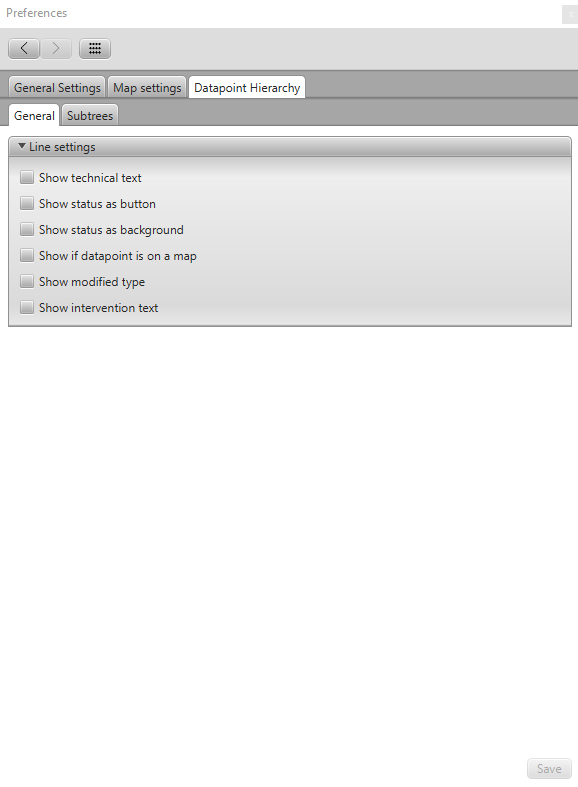
Don't forget to save the changes we made by clicking on the button SAVE.
Security settings
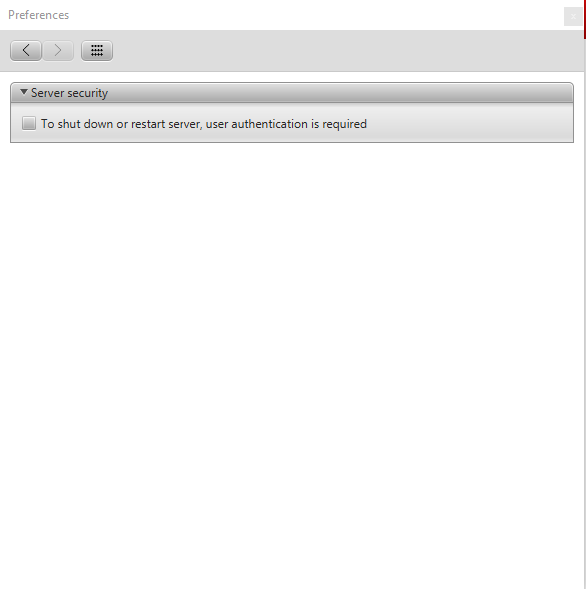
- This function is a great option to make sure, only an administrator is able to shut down or restart the server.(recommended)
Sound settings
Siwenoid uses different sounds for every event category. We can setup the details of this here.
- To play sounds we need to have an installed sound card.
- Sounds can only be played if there are speakers connected to the client computer.
Sound setting options
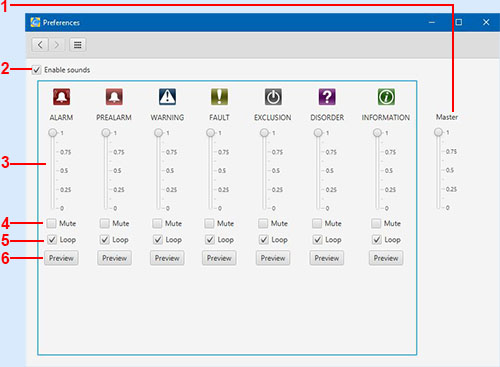
1) Main volume: The volume of Siwenoid in relation to other software's sounds in the operating system. By default every sound is the same volume as the operating system's volume.
- Every other sound volume (3) settings are in proportion to the main volume. If hte main volume os 0, then other sounds are muted regardless of their individual settings.
2) Enable sounds: If checked there are sounds in the software. / If unchecked then all sounds of the software is muted (not recommended).By default the sounds are enebled.
3) Volume controls by event categories: Every event category has its own volume setting. Other sounds can be assigned to every category (f.e.: alarms, exclusions use different sounds). By default the volume of every category is the same (every volume slider is at maximum value)
4) Mute button for every event category: We can enable/disable sounds for a selected category. By default every sound alert is enabled (recommended).
- For example uncheck the mark under "exclusions" if we don't want to hear the sound alert for exclusions. This way we get all sound notification exept the for the muted category.
5) Loop: Sound alerts are repeated till we acknowledge it in the software. If we uncheck this option then every sound alert will be played only once for every event. By default every sound alert is on loop till we acknowledge the event.
- Alarms should be left on loop so we wont miss it anyhow.
6) Preview: By clicking on the button we can listen to the sound of the category.By default every sound is the same volume as the operating system's volume.
- Actual alerts will sound the same.
- If we mute the sound of the operating system or we don't have speakers connected to the computer we won't hear the sound alerts. (not recommended)
Map settings
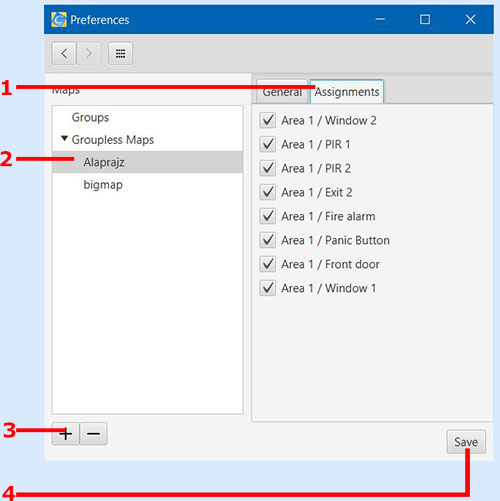
Here we can manage the maps in the software.
1) Assigments: Shows all datapoints which are assigned to the selected map(2). By unchecking the marks we are unassign the datapoint from the map.
2) List of maps: We can arrange maps to groups or we can use them without groups. We can rename maps by right-clicking on their names.
3) Adding New map or map group / delete existing map: We can arrange maps to groups or we can use them without groups. We can rename maps by right-clicking on their names.
4) Save button: If we made changes and want to save them this button will do it.
Creating map Groups
We can arrange maps to map groups for better transparency. We can make groups for every building on the site, etc.

1) Click on the "+" button (3), then select "Create new map group" option!
2) Right click on the item "New group" and select "Rename group"!
3) Type the desired name and hit enter!
Creating maps
We can create new maps from the main window by clicking "+", or from the map settings menu.

- We can define new maps in the main window too.
- Although map groups can only be created from the map settings menu.
A new tab opens on the main screen by the name of "New map".
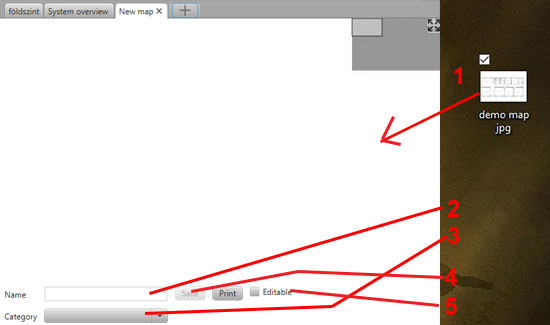
1) Drag the map file from the computer to the "new map" tab.
Locate the file on our computer.
Usable image file formats:
- JPEG, JPG
- PNG
2) Set the map's name. Here we can name the maps, for example "First floor blueprint".
3) Here we can select a map group for a map. If we already made some map groups we can select one for the map here.
4) Click on the "Save" button to save the changes we made.
- The "Save" button will be enabled if we entered a name for the map, and also have the map file dragged in siwenoid.
- The order of those two are arbitrary.
5) Attention! The maps are only editable if the "editable" checkbox is checked.
Putting datapoints onto maps
Search for the datapoints what we want to place on the maps on the "Datapoint hierarchy" tab on the main window.
Click with the mouse and drag the datapoint to the map!
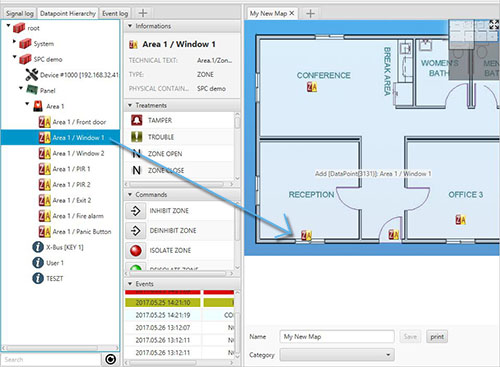
- Dont forget to click "save" after the changes or else our work become futile.
- Attention! The maps are only editable if the "editable" checkbox is checked.
Deleting maps
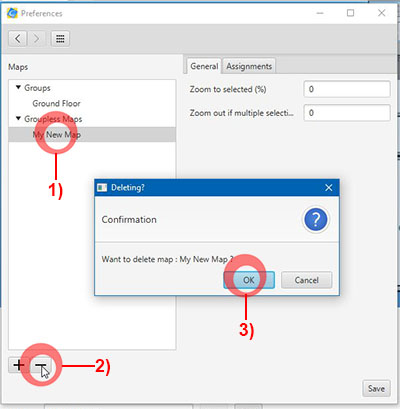
Open map settings from the settings menu.
1) Select the map we would like to delete.
2) Click on the button "-" in the left bottom corner!
- A confirmation question pops up.
3) Click "OK" to delete the map.
- If we changed our mind we can cancel deletion by pressing the "cancel" button.
Printer settings
If we would like to print out the event log, or trigger printing on alerts we have to setup a printer in Siwenoid.
Here we have the following options:
- Attention! We cannot setup the printer's preferences in Siwenoid. All printing is carried out by the preferences and settings made in the operating system.
- In Windows we can find our printers in Control panel → Devices and printers.
- The methods of setting up printers can be found in the printer's own documentation.
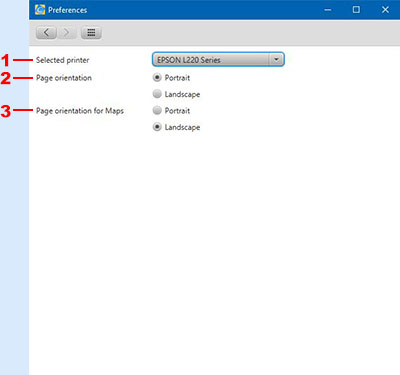
1) Select Printer Select the printer we would like to use from the pulldown menu. Here we found the list of printers installed in the operating system. Select the one we want Siwenoid to use.
2) Page orientation setiings Here we can select that how the lists and events are printed out. We can choose landscape or portrait orientation for maps and lists separately. In the example we selected "portrait" setting.
3) Page orientation setiings for printing maps Here we can select that how the maps are printed out. We can choose landscape or portrait orientation for maps and lists separately. In the example we selected "landscape" setting.
Physical structure
The physical structure contains all the datapoints (sensors, controllers, transmitters etc.) of the subsystems (fire alarm units, access control units etc.) what are connected to Siwenoid. This menu contains all information needed for the software to communicate with the subsystems.
Differences between physical and logical containers
When integrating a subsystem all its datapoints are arramnged into a hierarchycal tree with the subsystem itself as the parent unit. These are the physical containers. Later these (and their datapoints) can be arranged to logical trees.
For example after integrating an access control and a fire alarm unit it would be nice to see all datapoints under the same structural tree, like "First floor sensors". Since this tree is not bound to any physical subsystem we call these "Logical trees". More about their use later.
- The compatible subsystems have their own specific settings.
- On the example screen you can see the settings window for a Vanderbilt SPC 5300.
Adding and modifying physical containers
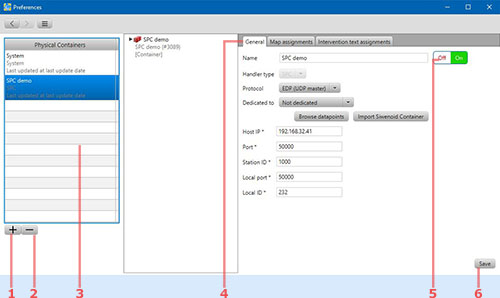
1) Add button: We can add to setup a new subsystem with this button.
2) Delete button: We remove the selected subsystem from the system.
3) List of physical containers: Here we can see the integrated subsystems.
- By clicking on their neame we can check or modify their settings (In the example it is hte "SPC demo").
4) General settings' window: We can find the subsystems possible settings here.
- Different options are shown after we select the "Handler type" from hte pulldoiwn menu. The appearing options are for the selected subsystem only.
- The differences between subsystems will be described in the chapter "Integrating / adding subsystems".
5) Communication switch: If we setupped the subsystem we can enable or disable the communication with it by this toggle button.
- At a well setupped subsystem the communication should be enabled all the time.
- If we disable communication we won't get any messages from the subsystem nor we can send commands to it.
6) Save button: If we setupped or modified the subsystem's settings we can save the changes with this button.
Map assignment overwatch
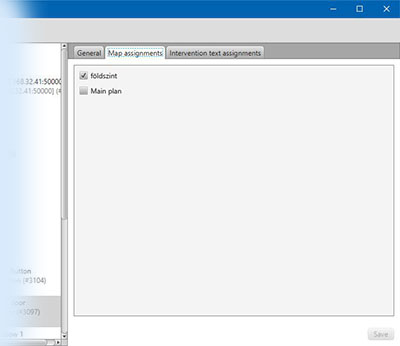
On the second tab of the window we can check that what map contains the selected datapoint.
Check the mark at the map we would like the datapoint to assign to.
- A datapoint can be assigned to a map even if it isn't represented on it. It is useful if we want to open a specific map on the datapoint's alerts.
It works both ways. If we uncheck the field the datapoint won't be assigned to that map - the map wont popup on alerts - but if we open the map itself we would see the datapoint previously put on it.
- This is useful if - for example - we use an "overview" style map, where all sectors are represented as a list.
Assigning intervention texts to datapoints
On the third tab of the window we can assign intervention texts to datapoint. (Intervention texts can be defined in File → Settings → Intervention)
1) Select the datapoint then click on the "intervention text assignments" tab.
We can see a list with the previously defined intervention texts (File → Settings → Intervention texts)
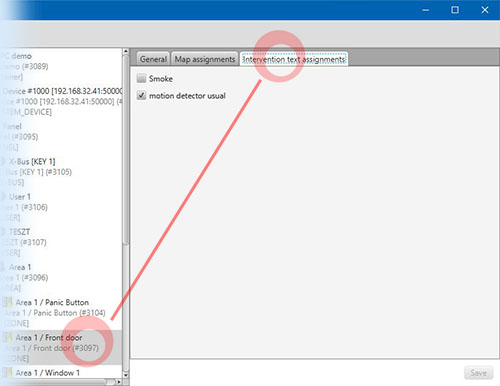
2) Check the mark at next to the Intervention text we would like to assign to the datapoint.
- We can assign more text to every datapoint.
3) If we finished save our changes with the "Save" button in the right bottom corner.
- This finalises our settings and assignments.
Here we can manage all the compatible system handler, their datapoint types, treatments (statuses) and commands.
The display is split into for hierarchal segmets for system handler → datapoint types (for the selected system) → datapoint treatments and commands (for the selected datapoint type). The last segment is for editing the command / treatment.
- The screen starts empty.
- Example: if we want to edit the "alarm" status of the SPC system's zones then we have to select Spc → Zone → Alarm.
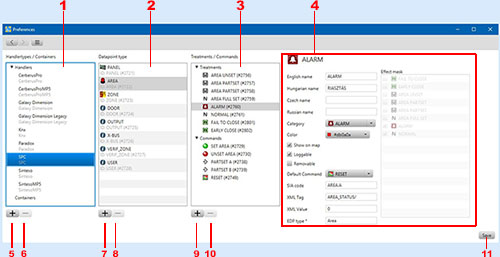
1) Handler type and name: The handlers for the subsystems can be seen here.
2) Datapoint types: Shows the datapoint types associated with the handler selected in (1).
3) Treatments (statuses) and commands: The commands and treatments associated with the selected datapoint type (2) can be seen here.
4) Command or treatment editing panel: The editable options of the commands and treatments selected in (3) can be seen here.
5) Add new handler: Here you can add the handler you would like to use.(If you have not done that during the install phase.)
6) Delete handler: The selected handler type is deleted from the system.
7) Add a new type of the datapoint: Manually adds a datapoint type to the handler selected in (1).
8) Delete a datapoint type: The selected datapoint type can be deleted from the system.
9) Add a new command or treatment: We can define new commands or treatments for the selected datapoint type.
10) Delete a command or treatment: The selected command or treatment can be deleted from the system.
Edit treatment
All status signals from the datapoints are ordered into a main status category.
These treatments can be modified.
- In the example we can see the "PANEL" datapoint type's "TAMPER ALARM" status of the SPC intrusion panel.
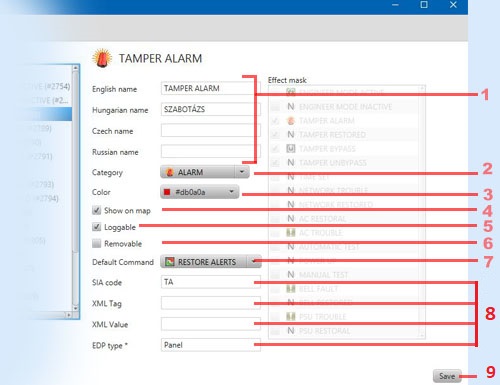
1) Language settings: Here we can name the treatments for all languages the system knows.
2) Category of the signal: The event category associated with the treatment. From the pulldown menu we can select the event category for the signal type (See also:→ Settings → Categories)
- In the example we can see that the treatment "Tamper" considered "Alarm" for the SPC intrusion detection units.
3) Color of the signal: Custom color can be assigned for the selected treatments. The signals inheriting the color of their parent category (for example "ALARM").
- If we change the color the signal will still be "Alarm" even if we choose a different color. It is wise not to use colors associated with different categories for it can be confusing.
- If we change the color the icon of the events with this signal won't change, just the background color for the events.
4) Viewable on map?: If this option is checked then the datapoints signaling this treatment are highlighted on the maps (if the datapoints are on a map).

- In the example the first datapoint's status is not shown on the map while the second is highlighted with the color of the "ALARM" category (the datapoint is in "Alarm" status).
5) Loggable?: If this is checked the events with this treatment are logged in the event log.
- It is not recommendede to change these settings!
6) Removable?: If this is checked the events with this treatment can be DELETED from the event log.
- It is not recommendede to change these settings!
7) Default command: We can select the default (most likely used) command for these events. The avaiable commands are the one that can be sent to the datapoints what can signal these events.
- In the example the "reset zone" command is selected becouse this is the most likely command that will be sent to the unit after an alarm.
8) Protocol settings: The following fields have to be filled in accordance with the protocol!
12) Save button: If we changed the settings and want to keep them we should click on this button after.
Editing commands
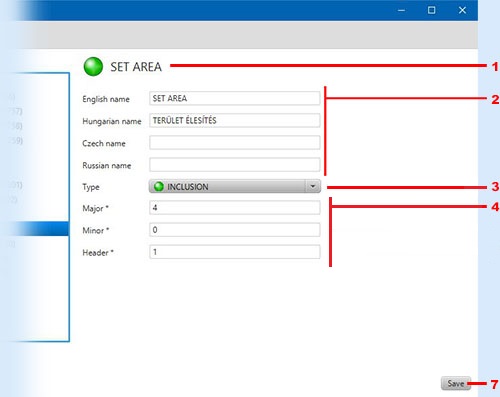
1) Icon and name
2) Language settings: Here we can name the commands for all languages the system knows.
3) Type: Here we can manage the type of the commands.
4) Protocol settings: The following fields have to be filled in accordance with the protocol!
7) Save button: If we changed the settings and want to keep them we should click on this button after.
15) Categories
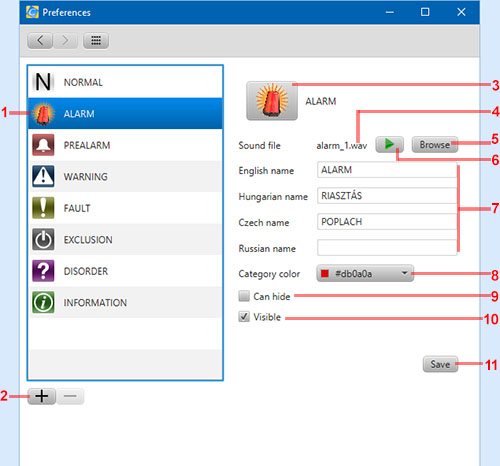
Here we can edit the event categories, or add a new one.
1) List of event categories: This is a list with all the event categories present in the system. The selected item is highlighted ("Alarm" in the example).
2) Add and remove category: With the "+" button we can create a new event category (for which we can assign treatments later). The "-" button deletes the selected category.
- The predefined categories cannot be deleted jut the ones we created. (As you can see on the picture the "-" button is disabled)
3) Icon of the category: The icon what will appear in the signal log.
- You can change the icon by clicking on it and then selecting an other from the computer.
- You can use .PNG files for icons.
- The system resizes the image we select for icon to match the system's needs.
4) Assigned sound file: Events with this category will trigger this sound.
- The software uses .WAV files.
5) Select sound file: By clicking on this button you can select a sound file for the event category. (note: if the sounds are muted then the selected sound won't be heard)
- The software uses .WAV files.
6) Preview: By clicking on the button we can listen to the sound of the category.
7) Name of the category: Name of the category in all languages the sotware can handle.
8) Color of the category: On the event category bar, in the signal and event log the signals with this category weill be highlighted by this color (like all alarms are red by default)
9) Can be hidden?: If the box is checked then by clicking on the name of the category on the event category bar we can hide all signals in the signal log.
10) Dedicated to window: If we open a new workplace(file-new workplace) then the dedicated category will appear on the new workplace instead of the main one.
11) Save button: We can save the changes we made by clicking on this button.
Object Restrictions
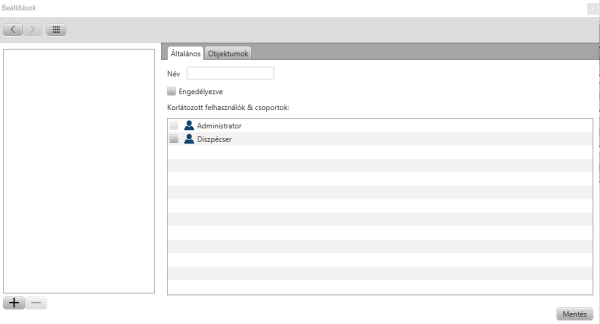
- Here we can add or delete object restrictions
Object restrictions is a great option to make the software more user friendly for a security guard for example.
By blocking unnecessary commands in the Objects tab with an admin user, the security user wouldn't even see them in the list.
Forced actions
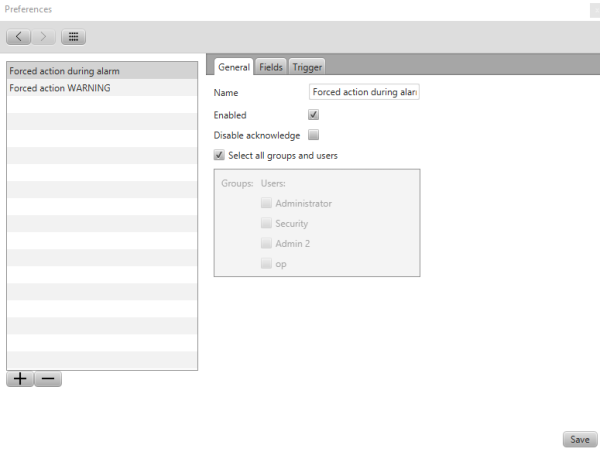
Forced actions are required tasks from the user during an event.
Datapoint is signaling, alarm event goes into the Signal log. The user must do a task like write a text about what happened or choose an option from a menu, before he can finally acknowledge the event.
Intervention / edit intervention texts
Intervention text(s) can be assigned to every datapoint. These texts pop up every time the assigned datapoint signals and can help the end users to manage alerts.
We can write these texts in this menu.
- We can write as many texts as we like.
- Also, one intervention text can be assigned to any datapoint. For example we can assign the same text to every smoke detectors for the maintenance crew etc.
- Also, any number of intervention texts can be assigned to a single datapoint.
- This menu helps us to manage and organise the intervention text. Use the "Physical structure" menu to assign these texts to datapoints.
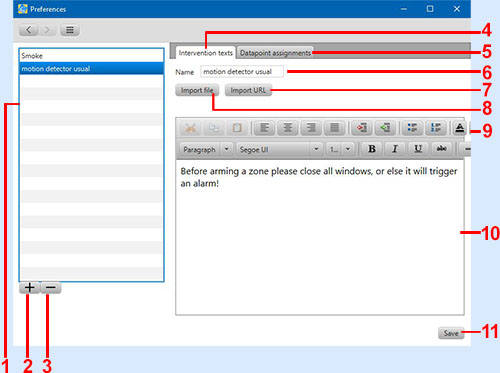
1) List of intervention texts: Here we can see the intervention texts already present in the system. If we select one (by clicking) then the text editor screen appears.
2) Add new text: Create a new intervention text with this button.
3) Delete selected: The selected (blue background) text can be deleted with this.
4) Text editor tab: We can edit the text on this tab.
5) Datapoint assignment tab: On this tab we can see which datapoints have the selected intervention text assigned to.
6) Name of the intervention text: Name of the intervention text
- It is wise to name them straightforwardly so we don't have to guess which one is what.
7) Import text from file: We can use previously defined TXT or HTML files to use as intervention texts.
8) Import text from URL: Siwenoid uses the file at the given URL as intervention text.
- The text are stored locally and when internet connection is present (or the web server is acessible in any way) the software checks if there are changes in the texts. If changes are found Siwenoid updates the intervention texts added by URL.
- Siwenoid often operates on closed networks where this function is not working, naturally.
- But the software can update texts from local webserver.
9) Text editor area: If we don't import our intervention texts then this WYSWYG editor helps us write them. We can use the general formatting options like headers, fonts etc.
10) Editing area: Here we can see and edit the intervention texts.
11) Save button: As usual the save button saves the changes we made.
Datapoint assignment tab
On this tab we can see which datapoints have the selected intervention text assigned to. You can add new datapoints here by dragging in datapoints from datapoint hierarchy.
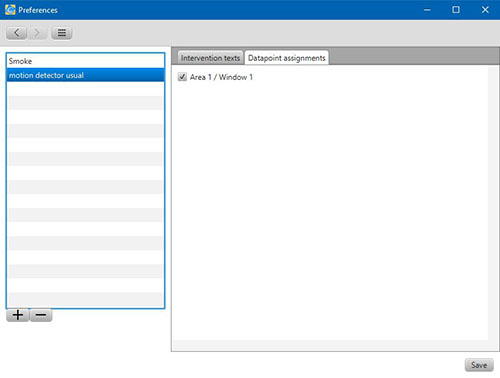
- On the example screen we can see that the selected text is assigned to only one datapoint ("Area 1 / Window 1").
Delete a datapoint assignment
Uncheck the mark next to the name of the datapoint then click "save".
This deletes the datapoint assignment for this Intervention text.
Safety backup
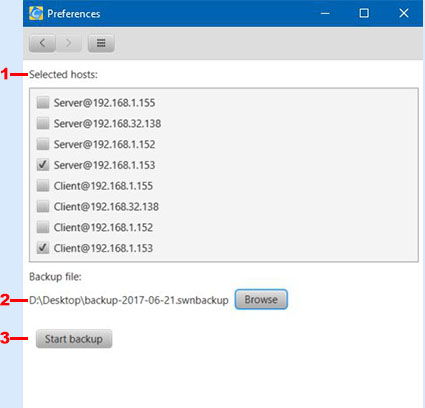
1) Select application to backup:
- Check the client and server we want to backup.
- In general installation the list should containt one server and one client.
- It is recommended to make backup of both the client and the server application.
2) browse button: By clicking on the browse button we can select the backup's location.
3) Start: If we selected the software we want to backup, plus the name of the backup we can start the process by this button.
Some progress bars are showing us the status of the backup process (as seen on this picture).
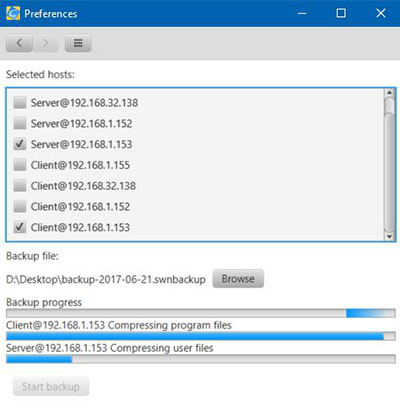
ATTENTION! On a bigger site with some-thousand datapoints the backup can take hours! It is recommended to make backup at times where we don't except maintenance and other events. (The software is operational during the backup process!)
Engineers know that a "million to one" disaster happens nine times out of ten. We should backup all systems regularly. After any software or hardware error we can revert to a backup.
We should make backup every time a new subsystem is connected, or every time we plan to make bigger changes to the system.
Always make backup of the client, server application and the database also.
- The backup's size is depending on the size of teh system (how many datapoint) and the size of the event log (how long the system is running). On a bigger (some thousand datapoints, months of operation) the backup can be more gigabyte.
- Never store the backup on the same computer where the software is installed. On a case of hardware error we can loose not just the system but the backup also.
Logging
The special settings for the event log can be found here.
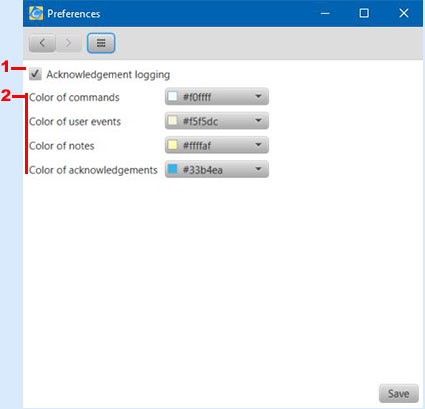
1) Acknowledgement logging
If we check this mark then Siwenoid will log even the acknowledgements in the software, not just the events.
- Attention! On bigger sites the event log's database can be much bigger with this option checked.
2) Special colours
The backgound of the events saved in the event log matches the event categorry color.
Here we can setup the color of those parts of the event log what are not generated by datapoints.
We have the following options:
- 1; Colour of commands: the colour of the commands sent to the subsystems.
- 2; User event's backgound colour.
- 3; Background color of the comments for events.
- 4; Color of the acknowledgements (if we log them).
Tasks
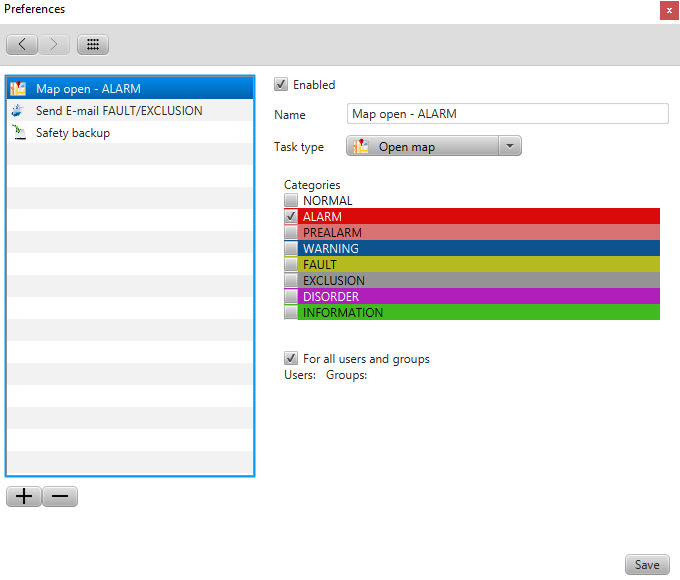
In tasks we can set automatic actions for the software.
Actions like these are: Automatic map opening, send SMS, send Email or Intervention text opening function.
Steps:
1) - Create a new Task.
2) - Choose Task from the drop-down menu.
3) - Select categories, the selected categories will trigger the Tasks.
4) - Save.
In the example, you can see a Task which will automatically opens the map when an alarm event comes in.
The alarmed datapoint will be highlighted in the alarm's category color.
Support
Licence
Users and Groups
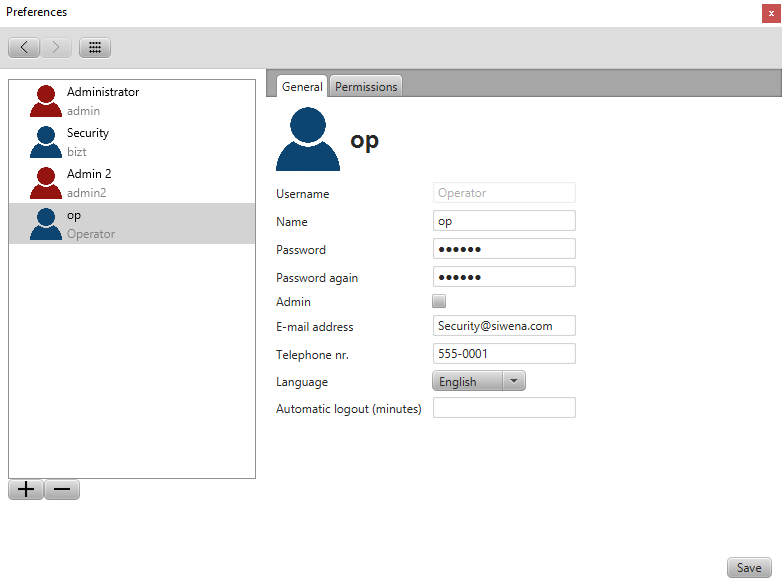
A felhasználók és felhasználó csoportok menüpontban nyílik lehetőség új felhasználó létrehozására, meglévő szerkesztésére, illetve a nyelvi és jogosultsági beállításokat is itt lehet szerkeszteni.
Amennyiben az adminisztrátori opció ki van jelölve, úgy a kreált felhasználó a szoftverhez beállításaihoz teljes körű hozzáférést kap.
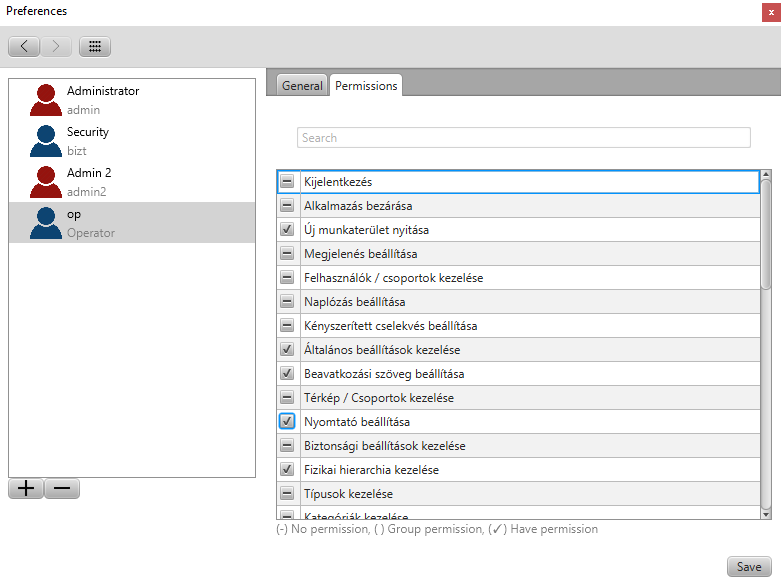
A kiválasztott felhasználónál az általános mellett található egy jogosultságok fül is.
Ebben a fülben a felhasználói engedélyek személyre szabhatóak.
A felhasználó korlátozható, így elkerülhető hogy illetéktelen felhasználó próbáljon változtatásokat véghezvinni a szoftverben.
Logical Containers
Modules
The settings for the moduls can be found here.
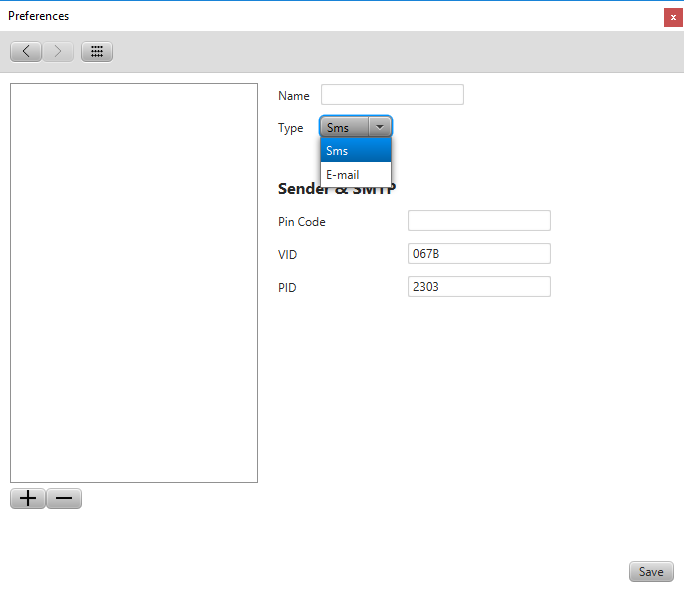
Here we can set the Siwenoid v2 to send us email or sms about important events. (We must have a valid sim card for sms notification)