Settings: Difference between revisions
mNo edit summary |
No edit summary |
||
| (9 intermediate revisions by the same user not shown) | |||
| Line 1: | Line 1: | ||
<b>Language</b> | ''Magyar: [[Beállítások]]'' | |||
''Previous chapter-> [[Map|Map]] | ''Previous chapter-> [[Map|Map]] | ||
__TOC__ | __TOC__ | ||
== | ==Displays== | ||
[[Image:Display1 en.JPG|left|thumb|400px]] | [[Image:Display1 en.JPG|left|thumb|400px]] | ||
In this section you can set, how many screens you'd like to use. You can set only as many you have plugged into your computer. | |||
<br style="clear: both" /> | <br style="clear: both" /> | ||
== | ==Display settings== | ||
[[Image:Display2 en.JPG|left|thumb|400px]] | [[Image:Display2 en.JPG|left|thumb|400px]] | ||
In this section, you can set, which Layout to load in, when you start the application. Here you can enable or disable the transport bar, and whether import the channels from the template or not. | |||
<br style="clear: both" /> | <br style="clear: both" /> | ||
[[Image:Display2 2 en.JPG|left|thumb|400px]] | [[Image:Display2 2 en.JPG|left|thumb|400px]] | ||
If you have multiple screens, the menu looks like this. | |||
<br style="clear: both" /> | <br style="clear: both" /> | ||
== | |||
==Warnings== | |||
[[Image:Warning en.JPG|left|thumb|400px]] | [[Image:Warning en.JPG|left|thumb|400px]] | ||
In this section, you can set, what kind of information you'd like to see about channels placed in the matrix. All settings have 3 states.<br> | |||
Always shown, if selected (Active), or Never shown. | |||
<br style="clear: both" /> | <br style="clear: both" /> | ||
[[Image:Live en.JPG|left|thumb|300px]] | [[Image:Live en.JPG|left|thumb|300px]] | ||
You can set, if the channel shows live footage, a text label indicates this in the bottom left corner. | |||
<br style="clear: both" /> | <br style="clear: both" /> | ||
[[Image:Archive en.JPG|left|thumb|300px]] | [[Image:Archive en.JPG|left|thumb|300px]] | ||
You can set, if the channel shows archive footage, a text label indicates this in the bottom left corner. | |||
<br style="clear: both" /> | <br style="clear: both" /> | ||
[[Image:Channel number.JPG|left|thumb|300px]] | [[Image:Channel number.JPG|left|thumb|300px]] | ||
You can set, whether the channel number is shown in the upper left corner or not. | |||
<br style="clear: both" /> | <br style="clear: both" /> | ||
[[Image:Channel number.JPG|left|thumb|300px]] | [[Image:Channel number.JPG|left|thumb|300px]] | ||
You can set, whether the channel name is shown in the upper left corner or not. | |||
<br style="clear: both" /> | <br style="clear: both" /> | ||
[[Image:Current time.JPG|left|thumb|300px]] | [[Image:Current time.JPG|left|thumb|300px]] | ||
You can set, whether the current time is shown in the bottom right corner or not. | |||
<br style="clear: both" /> | <br style="clear: both" /> | ||
Furthermore you can set, if the channel shows live footage, then the last option (current time) is overruled, and whether show background behind labels or not. | |||
== | ==Lincense informations== | ||
[[Image:Licence en.JPG|left|thumb|400px]] | [[Image:Licence en.JPG|left|thumb|400px]] | ||
In this section you can see the information about your license, as well as with the arrow pointing upwards you can create a license update request, so long as with the arrow pointing downwards you can update your license. | |||
<br style="clear: both" /> | <br style="clear: both" /> | ||
== | ==Backup - Restore== | ||
[[Image:Backup en.jpg|left|thumb| | [[Image:Backup en.jpg|left|thumb|600px]] | ||
The Backup - Restore menu can be reached this way:<br> | |||
'''Right click on the main screen > Preferences > Menu button > Backup/Restore button''' | |||
<br style="clear: both" /> | <br style="clear: both" /> | ||
[[Image:Backup2 en.jpg|left|thumb| | [[Image:Backup2 en.jpg|left|thumb|600px]] | ||
If you click on the Create backup button, you can create a backup with the help of a pop-up window, where we have to set the path and the the name of backup. | |||
<br style="clear: both" /> | <br style="clear: both" /> | ||
[[Image:Backup3 en.jpg|left|thumb| | [[Image:Backup3 en.jpg|left|thumb|600px]] | ||
If you click on the Restore button, you can restore a saved backup with the help of a pop-up window, where we have to find the stored backup, which we' like to use. | |||
<br style="clear: both" /> | <br style="clear: both" /> | ||
== | ==Users== | ||
[[Image:Users en.jpg|left|thumb| | [[Image:Users en.jpg|left|thumb|600px]] | ||
The Users menu can be reached this way:<br> | |||
'''Right click on the main screen > Preferences > Menu button > Users button''' | |||
<br style="clear: both" /> | <br style="clear: both" /> | ||
[[Image:User handling en.JPG|left|thumb| | [[Image:User handling en.JPG|left|thumb|500px]] | ||
If you click on the User management button, in a pop-up windows you can add/delete users and user groups. | |||
<br style="clear: both" /> | <br style="clear: both" /> | ||
[[Image:User handling2 en.JPG|left|thumb| | [[Image:User handling2 en.JPG|left|thumb|500px]] | ||
If you click on a user, you can edit its username, password and which group he belongs to. | |||
<br style="clear: both" /> | <br style="clear: both" /> | ||
[[Image:User handling3 en.JPG|left|thumb| | [[Image:User handling3 en.JPG|left|thumb|500px]] | ||
If you click on a user group, you can edit its name, and which permission the group has. | |||
<br style="clear: both" /> | <br style="clear: both" /> | ||
== | ==Controllers== | ||
[[Image:Controllers1 en.jpg|left|thumb| | [[Image:Controllers1 en.jpg|left|thumb|600px]] | ||
The Controller settings menu can be reached this way:<br> | |||
''' | '''Right click on the main screen > Preferences > Menu button > Controller settings button''' | ||
<br style="clear: both" /> | <br style="clear: both" /> | ||
[[Image:Controllers en.JPG|left|thumb| | [[Image:Controllers en.JPG|left|thumb|500px]] | ||
You can set, on which button, what kind of operation to execute.<br> | |||
A name, and a selction color can be set here as well. | |||
<br style="clear: both" /> | <br style="clear: both" /> | ||
== | ==Logical editor== | ||
[[Image:Logaical editor1 en.jpg|left|thumb| | [[Image:Logaical editor1 en.jpg|left|thumb|600px]] | ||
The Logical editor can be reached this way:<br> | |||
''' | '''Right click on the main screen > Preferences > Menu button > Logical editor button''' | ||
<br style="clear: both" /> | <br style="clear: both" /> | ||
[[Image:Logaical editor en.JPG|left|thumb| | [[Image:Logaical editor en.JPG|left|thumb|600px]] | ||
With the logical editor we can easily create automated events. We can import rules,<br> | |||
and we can create rules on our own, which we can save for later use as well.<br> | |||
<br style="clear: both" /> | <br style="clear: both" /> | ||
We can choose elements from 3 different groups. | |||
''' | '''Inputs:''' | ||
*Physical input - | *Physical input - It represents a GPIO. | ||
*Time input - | *Time input - It generates time impulses. | ||
*TCP Client - TCP Client | *TCP Client - It represents a TCP Client. | ||
*TCP Petrol - ACIS | *TCP Petrol - ACIS protocol, essentially it's a TCP Client as well. | ||
''' | '''Logics:''' | ||
*And - | *And - Logical "AND", true, if all inputs are true. With the number in the center of the box, we can define how many inputs we'd like. | ||
*Or - | *Or - Logical "OR", true, one of the inputs are true. With the number in the center of the box, we can define how many inputs we'd like. | ||
*XOr - " | *XOr - "Exclusive OR", it's like the OR, only here if both inputs are true then the output is false. | ||
*Not - | *Not - Inverts the input values (Ture > False, True > False) | ||
*If true - | *If true - If the input is ture, executes the procedures after it. If the input is false, it doesn't perform it. | ||
*If false - | *If false - If the input is false, executes the procedures after it. If the input is true, it doesn't perform it. | ||
*On change - | *On change - If the input changes, executes the procedures after it. | ||
*Gate - | *Gate - Due to the red logical input transfers from the other input values or not. | ||
*Switch - | *Switch - Double click it, you can write a little program in it, if it's activated the program executes. | ||
*Splitter - | *Splitter - Splits the input value to multiple outputs. With the number in the center of the box, we can define how many outputs we'd like. | ||
*Synchronizer - | *Synchronizer - Synchronizes the inputs, and forwards them at the same time. With the number in the center of the box, we can define how many inputs we'd like. | ||
*Delay - | *Delay - Delays the transfer with the number defined in box. The delay is in seconds. | ||
*== - | *== - Checks equality with the number defined in the box. Returns true/false. | ||
*< - | *< - Checks if the number defined in the box is greater than the input. Returns true/false. | ||
*<= - | *<= - Checks if the number defined in the box is greater or equals to the input. Returns true/false. | ||
*> - | *> - Checks if the number defined in the box is smaller than the input. Returns true/false. | ||
*>= - | *>= - Checks if the number defined in the box is samller or equals to the input. Returns true/false. | ||
''' | '''Outputs:''' | ||
*Camera preset - | *Camera preset - Pops a predefined camera preset, if activated. | ||
*Matrix control - | *Matrix control - Pops a predefined matrix control, if activated. | ||
*TCP Client - | *TCP Client - Same as the input one. | ||
*ALPR - | *ALPR - If activated, starts the Automatic License Plate Recognition service. | ||
*TTS - | *TTS - If activated, starts the Text to Speach service. | ||
*MsgBox - | *MsgBox - If activated, pops a MessageBox. | ||
*AlarmSound - | *AlarmSound - If activated, starts and AlarmSound. | ||
<br style="clear: both" /> | <br style="clear: both" /> | ||
Latest revision as of 10:07, 8 December 2015
Language | Magyar: Beállítások
Previous chapter-> Map
Displays

In this section you can set, how many screens you'd like to use. You can set only as many you have plugged into your computer.
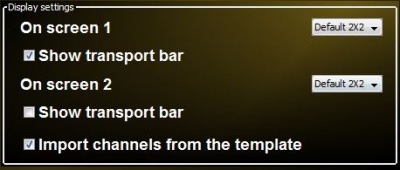
Display settings

In this section, you can set, which Layout to load in, when you start the application. Here you can enable or disable the transport bar, and whether import the channels from the template or not.
If you have multiple screens, the menu looks like this.
Warnings
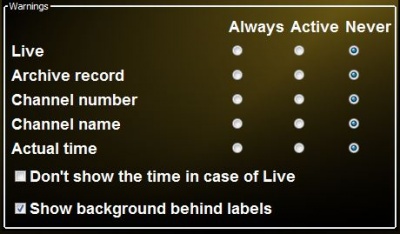
In this section, you can set, what kind of information you'd like to see about channels placed in the matrix. All settings have 3 states.
Always shown, if selected (Active), or Never shown.
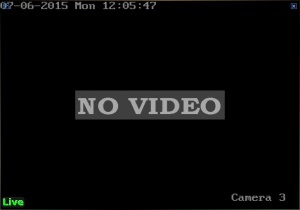
You can set, if the channel shows live footage, a text label indicates this in the bottom left corner.
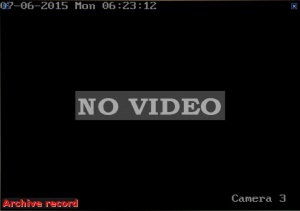
You can set, if the channel shows archive footage, a text label indicates this in the bottom left corner.
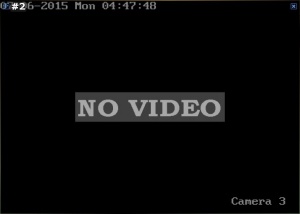
You can set, whether the channel number is shown in the upper left corner or not.

You can set, whether the channel name is shown in the upper left corner or not.
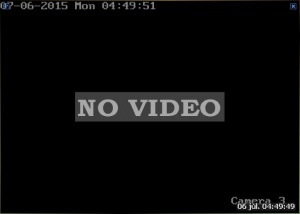
You can set, whether the current time is shown in the bottom right corner or not.
Furthermore you can set, if the channel shows live footage, then the last option (current time) is overruled, and whether show background behind labels or not.
Lincense informations
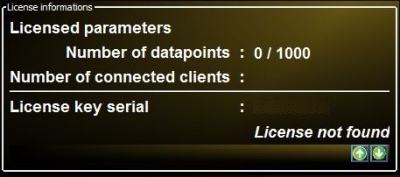
In this section you can see the information about your license, as well as with the arrow pointing upwards you can create a license update request, so long as with the arrow pointing downwards you can update your license.
Backup - Restore
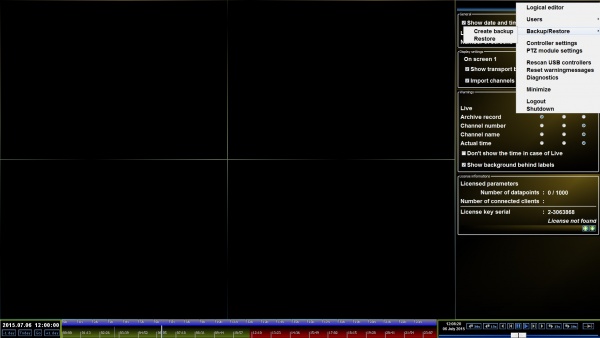
The Backup - Restore menu can be reached this way:
Right click on the main screen > Preferences > Menu button > Backup/Restore button
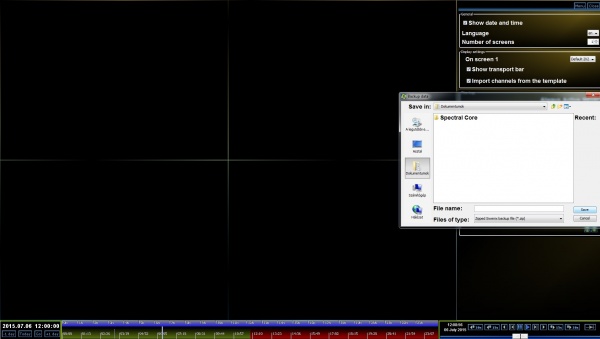
If you click on the Create backup button, you can create a backup with the help of a pop-up window, where we have to set the path and the the name of backup.
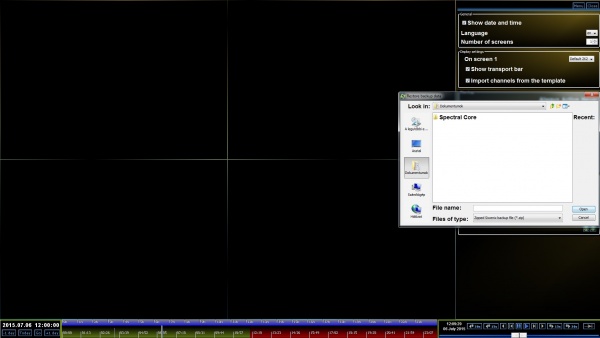
If you click on the Restore button, you can restore a saved backup with the help of a pop-up window, where we have to find the stored backup, which we' like to use.
Users
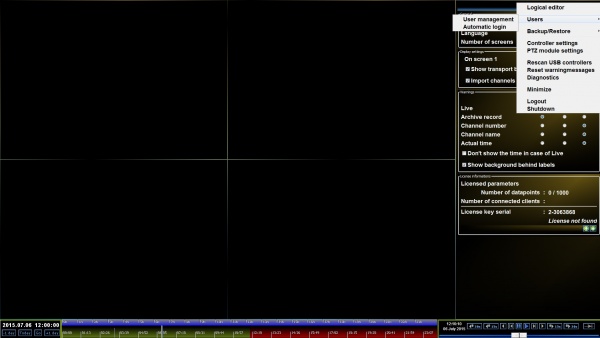
The Users menu can be reached this way:
Right click on the main screen > Preferences > Menu button > Users button
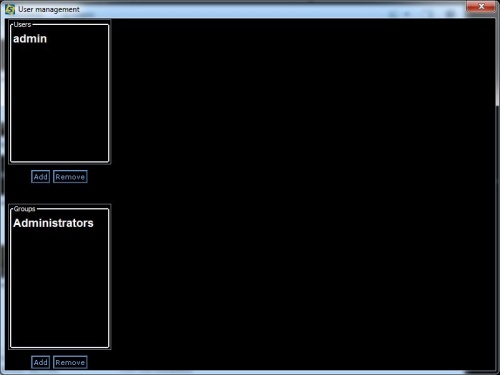
If you click on the User management button, in a pop-up windows you can add/delete users and user groups.
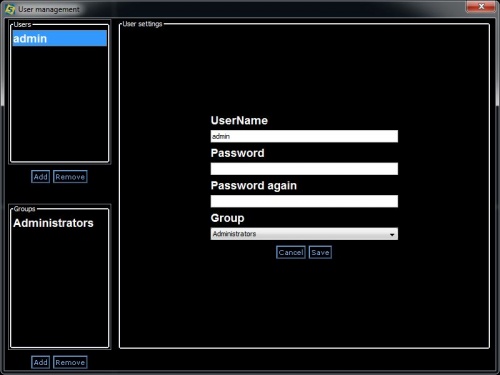
If you click on a user, you can edit its username, password and which group he belongs to.
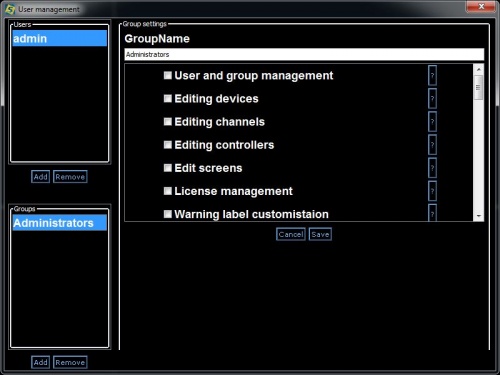
If you click on a user group, you can edit its name, and which permission the group has.
Controllers
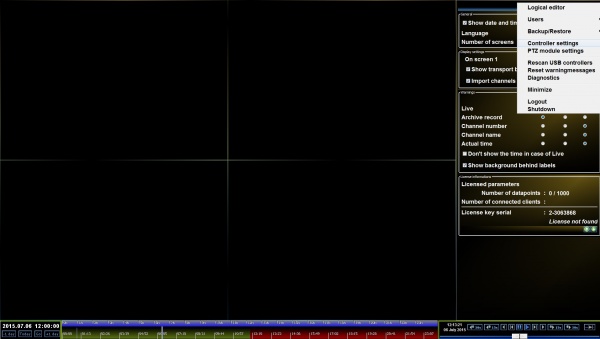
The Controller settings menu can be reached this way:
Right click on the main screen > Preferences > Menu button > Controller settings button
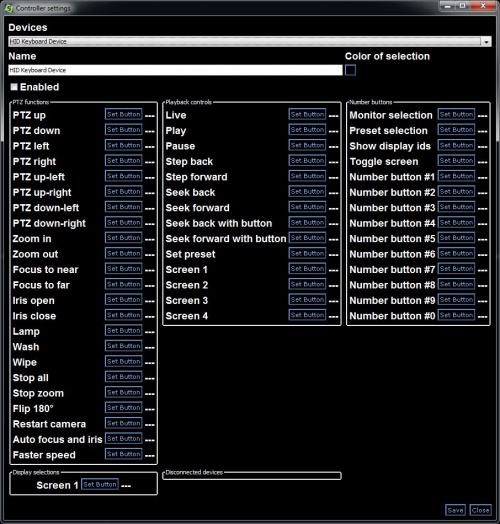
You can set, on which button, what kind of operation to execute.
A name, and a selction color can be set here as well.
Logical editor
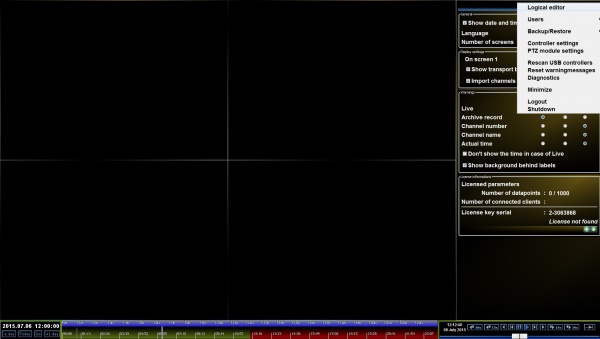
The Logical editor can be reached this way:
Right click on the main screen > Preferences > Menu button > Logical editor button
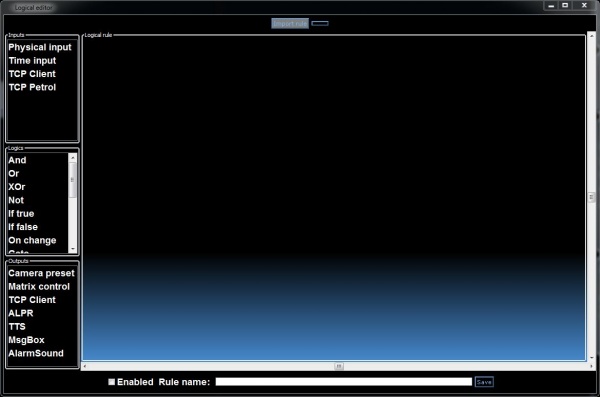
With the logical editor we can easily create automated events. We can import rules,
and we can create rules on our own, which we can save for later use as well.
We can choose elements from 3 different groups.
Inputs:
- Physical input - It represents a GPIO.
- Time input - It generates time impulses.
- TCP Client - It represents a TCP Client.
- TCP Petrol - ACIS protocol, essentially it's a TCP Client as well.
Logics:
- And - Logical "AND", true, if all inputs are true. With the number in the center of the box, we can define how many inputs we'd like.
- Or - Logical "OR", true, one of the inputs are true. With the number in the center of the box, we can define how many inputs we'd like.
- XOr - "Exclusive OR", it's like the OR, only here if both inputs are true then the output is false.
- Not - Inverts the input values (Ture > False, True > False)
- If true - If the input is ture, executes the procedures after it. If the input is false, it doesn't perform it.
- If false - If the input is false, executes the procedures after it. If the input is true, it doesn't perform it.
- On change - If the input changes, executes the procedures after it.
- Gate - Due to the red logical input transfers from the other input values or not.
- Switch - Double click it, you can write a little program in it, if it's activated the program executes.
- Splitter - Splits the input value to multiple outputs. With the number in the center of the box, we can define how many outputs we'd like.
- Synchronizer - Synchronizes the inputs, and forwards them at the same time. With the number in the center of the box, we can define how many inputs we'd like.
- Delay - Delays the transfer with the number defined in box. The delay is in seconds.
- == - Checks equality with the number defined in the box. Returns true/false.
- < - Checks if the number defined in the box is greater than the input. Returns true/false.
- <= - Checks if the number defined in the box is greater or equals to the input. Returns true/false.
- > - Checks if the number defined in the box is smaller than the input. Returns true/false.
- >= - Checks if the number defined in the box is samller or equals to the input. Returns true/false.
Outputs:
- Camera preset - Pops a predefined camera preset, if activated.
- Matrix control - Pops a predefined matrix control, if activated.
- TCP Client - Same as the input one.
- ALPR - If activated, starts the Automatic License Plate Recognition service.
- TTS - If activated, starts the Text to Speach service.
- MsgBox - If activated, pops a MessageBox.
- AlarmSound - If activated, starts and AlarmSound.