Satel configuration: Difference between revisions
| Line 12: | Line 12: | ||
To enter the configuration site enter the username and the password. (Default username: , password: ) | To enter the configuration site enter the username and the password. (Default username: , password: ) | ||
If it allowed to access, click on "UART" menu on the left side of the site. To setting up the connection between ATC-1000 and Satel INT-RS, enter the following settings: | If it allowed to access, click on "UART" menu on the left side of the site. To setting up the connection between ATC-1000 and Satel INT-RS, enter the following settings: | ||
<br> | <br style="clear: both" /> | ||
[[Image:SatelATCconf.png|left|thumb|200px]] | [[Image:SatelATCconf.png|left|thumb|200px]] | ||
Mode: RS232<br> | Mode: RS232<br> | ||
Revision as of 09:20, 8 August 2013
| Language: | English • magyar |
|---|
Previous chapter-> Lantronix configuration / Next chapter-> CCTV configuration
Configuring Satel Integra
Satel Integra can connect to Siwenoid through a Satel INT-RS interface modul. It ensures a RS-232 connection to Integra panel. Most of newer computers haven't got any serial (RS-232) connection. Thatswhy we need a TCP-IP to RS-232 converter. In this configuration tutorial, we use an ATC-1000 converter.
ATC-1000's default IP address is: xxx.xxx.xxx.xxx. The default port is: xxxx.
We need to connect it to the computer, and type this ip addres in a web browser.
To enter the configuration site enter the username and the password. (Default username: , password: )
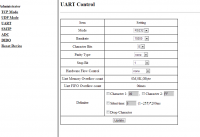
If it allowed to access, click on "UART" menu on the left side of the site. To setting up the connection between ATC-1000 and Satel INT-RS, enter the following settings:

Mode: RS232
Baudrate: 19200
Character Bits: 8
Parity Type: none
Stop Bit: 1
Hardware Flow Control: none
On Delimiter, leave blank all checkboxes.
User Management

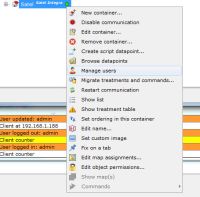
To use user management features of Siwenoid, you should choose a capable device such as Satel Integra. In the Datapoint Hierarchy right click on Satel container, and a popup menu appears.
If Container correctly configured (i.e. it could download datapoint hirearchy of the device) and you have permission to access user management functions, a "Manage Users" option will shown.

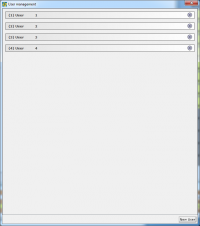
The User management window contains the actual user informations that in the device currently stored. The lines of the users are clickables, and can use to show or edit (if you have permission) the selected user's preferences.

There are several tabs to separate different properties to change. On General tab you can find the Username and the Passcode (or password) field. On Satel Integra here you can find the User type and warning messages as well.
If you want to edit a user, you don't have to fill the Passcode field. If you leave it blank, the Passcode won't change.
Tips: On Satel Integra supports the Usernames up to 16 characters, and the Passcode up to 8 numbers. (Siwenoid will check if some of them are longer. But it accepts shorter passcodes then 4 characters however in general on Satel Integra the minimum lenght of passcode is 4 characters.)

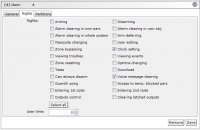
There is a Rights tab, which contains the available user rights on the used device. The selected user will have the permissions that were checked.
User time is a special number to represent the Scheduled user's schedule time, or if the user type is time renewable, it means the availablity time.
Partitions tab contains the user's partitions to have permission to access.
To apply edited attributes on the selected user, click on Save button at the bottom right of the user's editor box. To remove the seleceted user, click on the Remove button at the bottom right of the user's editor box.
To add a new user, click on the New User button at the bottom right of the User management window. A new blank expanded user entity will appear. Just enter the parameters and click on Save button to apply or to the Remove button to cancel.