First SIWENOID startup: Difference between revisions
(Created page with ' A rendszer első indítása Az alkalmazásuk a telepített mappájuk gyökerében található start-server.bat illetve start-client.bat állományokkal indíthatóak. A szerve…') |
|||
| (18 intermediate revisions by the same user not shown) | |||
| Line 1: | Line 1: | ||
{{Languages|First SIWENOID startup}} | |||
''Previous chapter-> [[Installation under Windows]] / Next chapter-> [[Config file parameters]]'' | |||
__TOC__ | |||
===Launch of applications=== | |||
[[Image:inst_image22.png|left|thumb|400px]] Server and client applications can be launched by start-server.bat and start-client.bat files that are located in the root directory of server and client installations. At the first start of server the system prompt to create a user with admin rights. Both user name and its password are up to you. | |||
<br style="clear: both" /> | |||
[[Image:inst_image25.png|left|thumb|400px]] If server is productive then a tray icon inform you about its status. | |||
<br style="clear: both" /> | |||
[[Image:inst_image26.png|left|thumb|400px]] Click on the tray icon to open its popup menu. Here you can restart, shutdown the server and licenc informations are shown. Here (and also in client) you can activate a remote licenc upgrade or feed the new licenc file. | |||
<br style="clear: both" /> | |||
[[Image:inst_image35.png|left|thumb|400px]] Launching the client application a login window appears and it also inform you if client has been connected to its server. At first login you should use the username and password that was created at first server start (see above). | |||
<br style="clear: both" /> | |||
[[Image:inst_image13.png|left|thumb|400px]] After login you can change the language of user interface of admin user. Use menu->users->user name->edit user submenu. | |||
<br style="clear: both" /> | |||
[[Image:inst_image28.png|left|thumb|400px]] On the dialog use Language selection box to select hu, and confirm your choice with OK. | |||
<br style="clear: both" /> | |||
[[Image:inst_image03.png|left|thumb|400px]] After selection of user language logout by clicking on the user name button on the top left. Now at next login type your username and password and user interface will appear in hungarian. | |||
<br style="clear: both" /> | |||
===Default treatment migration=== | |||
<font color=red>This is superseded. This is done automatically during first server startup.</font> | |||
[[Image:inst_image18.png|left|thumb|400px]] During server installation some csv files are copied to the server folder. These associate the subsystem modules that were selected during instalation. They has to be imported so that the subsystem telegrams and status can be interpreted in the system. First click on Tree button to open datapoint hierarchy. Then right click on root container. Then choose Treatment and command migration submenu and the appropriate subsystem. | |||
<br style="clear: both" /> | |||
[[Image:inst_image20.png|left|thumb|400px]] In the file open dialog navigate to the folder of server and select the appropriate file. These treatment definition files have the following name convention: treatment_table_<alrendszer-neve->.csv. For example treatment_table_cc11.csv file belongs to the CC11 subsystem. Select a file and confirm your selection. A dialog notify about the successful migration of treatment file. | |||
<br style="clear: both" /> | |||
''Previous chapter-> [[Installation under Windows]] / Next chapter-> [[Config file parameters]]'' | |||
[[Category:Installation]] | |||
Latest revision as of 13:38, 2 December 2013
| Language: | English • magyar |
|---|
Previous chapter-> Installation under Windows / Next chapter-> Config file parameters
Launch of applications
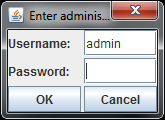
Server and client applications can be launched by start-server.bat and start-client.bat files that are located in the root directory of server and client installations. At the first start of server the system prompt to create a user with admin rights. Both user name and its password are up to you.

If server is productive then a tray icon inform you about its status.
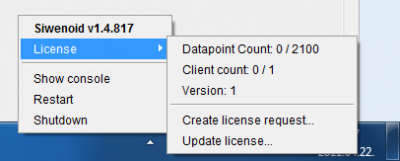
Click on the tray icon to open its popup menu. Here you can restart, shutdown the server and licenc informations are shown. Here (and also in client) you can activate a remote licenc upgrade or feed the new licenc file.
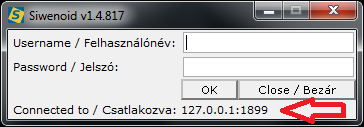
Launching the client application a login window appears and it also inform you if client has been connected to its server. At first login you should use the username and password that was created at first server start (see above).
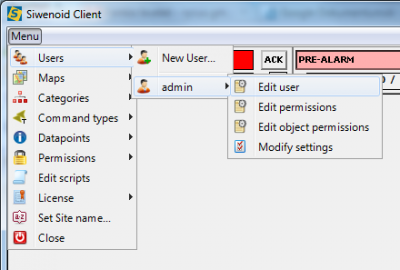
After login you can change the language of user interface of admin user. Use menu->users->user name->edit user submenu.
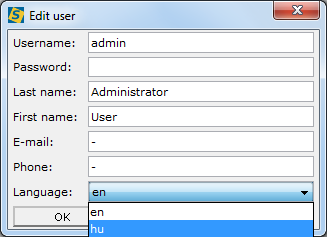
On the dialog use Language selection box to select hu, and confirm your choice with OK.
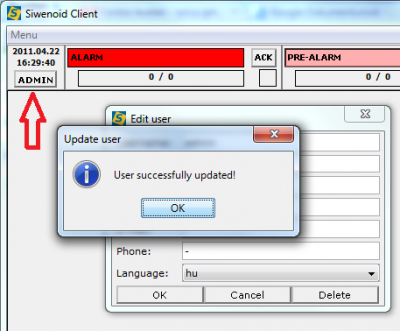
After selection of user language logout by clicking on the user name button on the top left. Now at next login type your username and password and user interface will appear in hungarian.
Default treatment migration
This is superseded. This is done automatically during first server startup.
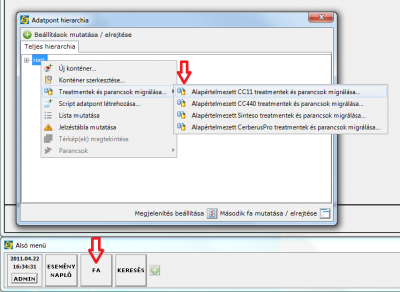
During server installation some csv files are copied to the server folder. These associate the subsystem modules that were selected during instalation. They has to be imported so that the subsystem telegrams and status can be interpreted in the system. First click on Tree button to open datapoint hierarchy. Then right click on root container. Then choose Treatment and command migration submenu and the appropriate subsystem.
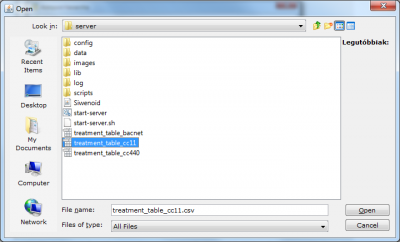
In the file open dialog navigate to the folder of server and select the appropriate file. These treatment definition files have the following name convention: treatment_table_<alrendszer-neve->.csv. For example treatment_table_cc11.csv file belongs to the CC11 subsystem. Select a file and confirm your selection. A dialog notify about the successful migration of treatment file.
Previous chapter-> Installation under Windows / Next chapter-> Config file parameters