Siwenoid system preferences engineering options
| Language: | English |
|---|
System preferences, engineering options
Every setting of Siwenoid V2 can be found in the Preferences options in the File menu.
- The menu items (and their submenus) can be accessed with the corresponding permissions
- In this chapter we cover the use of the menu items of the Preferences menu.
This part is mainly for the engineers who are activating and configuring the system but some of the segments are for the end-users comfort.
We can access the preferences by clicking on the FILE menu / SETTINGS where we can see the categories of the options.
Three navigation button helps us to find our way around in the menu.
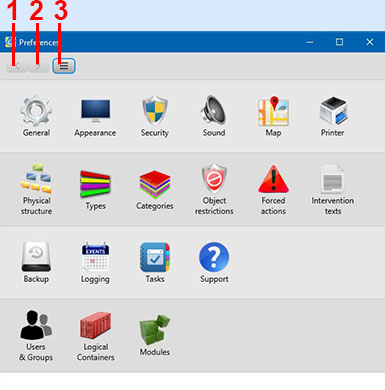
1) Opens the previous window we used.
2) Opens the next window.
3) Jumps to home screen of settings (as seen on the picture).
- ' Siwenoid can be configured during operation without loosing functionality.
2) General Settings
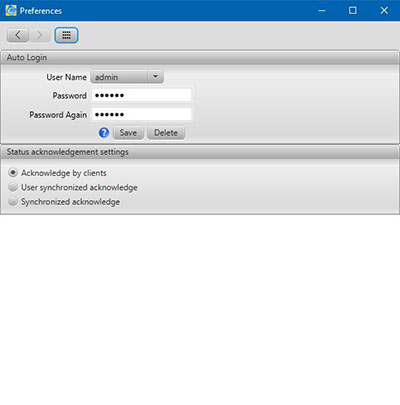
Setup Auto Login
In general settings we can setup automatic login. On a Siwenoid client we can setup a user what will automatically log in on system starting so we can skip the login screen.
- If the client is used on a specific workplace (for example a dispatcher room) and there is 1 user for the security guards we can make their life easier.
On system startup the softwer will skip the login screen and will automatically log in the setupped user.
- If we want to use a different user (for example administrator) then we can do this by selecting "SWITCH USER" from the FILE menu.
- It is wise not to setup an Administrator user for auto login.
- The password set here also have 1024bit encryption.
Status acknowledgement setting
On multiple client configuration we can setup how the acknowledgement of the incoming alerts/signals should be done:
- Acknowledge by clients: If a signal is acknowledged on one client then on the other client it is shown as an acknowledged signal (inverted background). No client can miss any signaling.
- User synchronized acknowledge: If there are multiple clients using the same username and password then any acknowledgement will shown synchronized on every client using the same user.
- Synchronized acknowledgement: Every client every user sees the same signal log.
3) Appearance settings
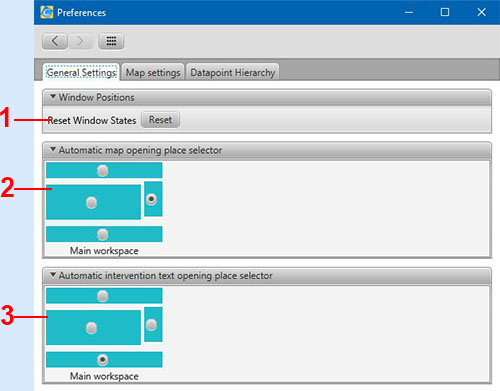
1) Reset window states: By pressing the button "reset" we can set all opened windows' position to default.
- It is useful (for example) when we used multiple monitor configuration before and now we cannot find some of our windows on the screen. On click on the reset button will solve this.
2) Automatic map opening selector: Here we can select that which workplace of the screen should the automatic map opening use to display maps. (The workplace of the main screen)
3) Automatic Intervention text opening place selector: Here we can select that which workplace of the screen should the automatic map opening use to display maps. (The workplace of the main screen)
4) Map settings tab
Here we can select the contents of the tooltip on datapoints represented on maps.
- Check every item we would like to see as a tooltip while hovering the mouse cursor on the maps' datapoints.
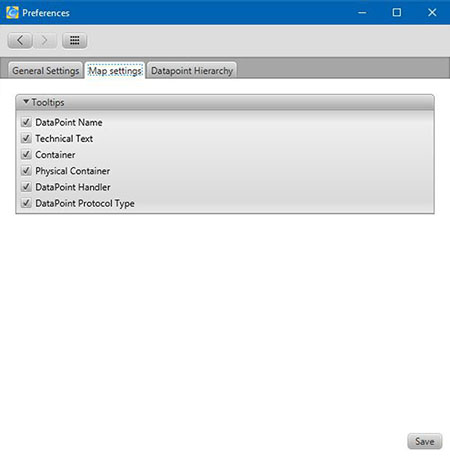
Don't forget to save the changes we made by clicking on the button SAVE.
5) Datapoint hierarchy tab
-
6) Security settings
-
7) Sound settings
Siwenoid uses different sounds for every event category. We can setup the details of this here.
- To play sounds we need to have an installed sound card.
- Sounds can only be played if there are speakers connected to the client computer.
Sound setting options
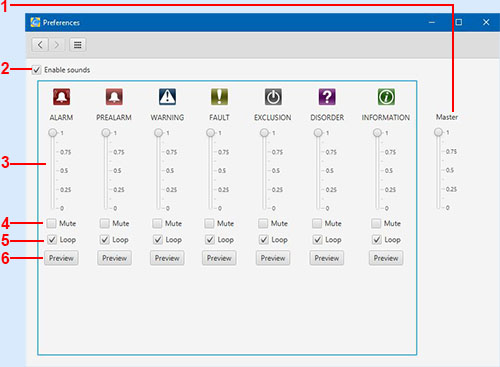
1) Main volume: The volume of Siwenoid in relation to other software's sounds in the operating system. By default every sound is the same volume as the operating system's volume.
- Every other sound volume (3) settings are in proportion to the main volume. If hte main volume os 0, then other sounds are muted regardless of their individual settings.
2) Enable sounds: If checked there are sounds in the software. / If unchecked then all sounds of the software is muted (not recommended).By default the sounds are enebled.
3) Volume controls by event categories: Every event category has its own volume setting. Other sounds can be assigned to every category (f.e.: alarms, exclusions use different sounds). By default the volume of every category is the same (every volume slider is at maximum value)
4) Mute button for every event category: We can enable/disable sounds for a selected category. By default every sound alert is enabled (recommended).
- For example uncheck the mark under "exclusions" if we don't want to hear the sound alert for exclusions. This way we get all sound notification exept the for the muted category.
5) Loop: Sound alerts are repeated till we acknowledge it in the software. If we uncheck this option then every sound alert will be played only once for every event. By default every sound alert is on loop till we acknowledge the event.
- Alarms should be left on loop so we wont miss it anyhow.
6) Preview: By clicking on the button we can listen to the sound of the category.By default every sound is the same volume as the operating system's volume.
- Actual alerts will sound the same.
- If we mute the sound of the operating system or we don't have speakers connected to the computer we won't hear the sound alerts. (not recommended)
8) Map settings
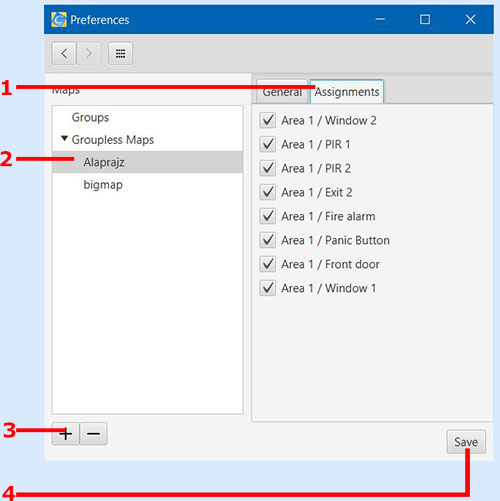
Here we can manage the maps in the software.
1) Assigments: Shows all datapoints which are assigned to the selected map(2). By unchecking the marks we are unassign the datapoint from the map.
2) List of maps: We can arrange maps to groups or we can use them without groups. We can rename maps by right-clicking on their names.
3) Adding New map or map group / delete existing map: We can arrange maps to groups or we can use them without groups. We can rename maps by right-clicking on their names.
4) Save button: If we made changes and want to save them this button will do it.
Creating map Groups