Detectomat configuration: Difference between revisions
No edit summary |
No edit summary |
||
| (10 intermediate revisions by the same user not shown) | |||
| Line 1: | Line 1: | ||
{{Languages| | {{Languages|Detectomat configuration}} | ||
''Previous chapter-> [[ | ''Previous chapter-> [[Satel configuration]] / Next chapter-> [[SPC6xxx configuration]]'' | ||
__TOC__ | __TOC__ | ||
| Line 11: | Line 11: | ||
[[Image:Tn_ATC.png|left|thumb|200px]] ATC-1000's default IP address is: 192.168.2.1 The default port is: 23. | [[Image:Tn_ATC.png|left|thumb|200px]] ATC-1000's default IP address is: 192.168.2.1 The default port is: 23. | ||
We need to connect it to the computer, and type this ip address in a web browser. | We need to connect it to the computer, and type this ip address in a web browser. | ||
To enter the configuration site enter the username and the password. (Default username: , password: ) | To enter the configuration site enter the username and the password. (Default username: admin, password: system) | ||
If it allowed to access, click on "UART" menu on the left side of the site. To setting up the connection between ATC-1000 and Detectomat fire alarm system, enter the following settings: | If it allowed to access, click on "UART" menu on the left side of the site. To setting up the connection between ATC-1000 and Detectomat fire alarm system, enter the following settings: | ||
<br style="clear: both" /> | <br style="clear: both" /> | ||
| Line 29: | Line 29: | ||
<br style="clear: both" /> | <br style="clear: both" /> | ||
Use a standard RS232 cable to make connection between Detectomat fire alarm system and ATC-1000. | |||
<br style="clear: both" /> | <br style="clear: both" /> | ||
=== Connecting by Lantronix === | |||
To set up Lantronix please follow this guide: [[Lantronix configuration]] | |||
[[ | |||
<br style="clear: both" /> | <br style="clear: both" /> | ||
Use this settings: | |||
Baudrate: 9600<br> | |||
Character Bits: 8<br> | |||
Parity Type: none<br> | |||
Stop Bit: 1<br> | |||
Hardware Flow Control: none<br> | |||
<br style="clear: both" /> | <br style="clear: both" /> | ||
[[Image: | == Setting up the fire alarm system == | ||
[[Image:DetectomatFireAlarmSystem.png|left|thumb|200px]]To enable communication with Detectomat fire alarm system, enter in System parameter settings on the panel. Select the parameter #16, and change the value to 6. It will enable the operation and display with new protocol. | |||
<br style="clear: both" /> | <br style="clear: both" /> | ||
== | == Setting up in Siwenoid == | ||
[[Image: | [[Image:SatelConfig1.png|left|thumb|200px]] In Siwenoid Client, click on the Datapoint Hierarchy tree button. Right click on the root container, and select "New container" menu. | ||
<br style="clear: both" /> | <br style="clear: both" /> | ||
[[Image: | [[Image:DetectomatContainerSettings.png|left|thumb|200px]] Enter a chosen name for Detectomat fire alarm system. Select "Detectomat" in the Type, and "Detectomat-ATC" in the Protocol dropdown list if you use the ATC-1000 converter, or "Detectomat" in other case. <br> | ||
The Host field must be the IP of the converter's IP address, just like on the Port field.<br> | |||
<br style="clear: both" /> | <br style="clear: both" /> | ||
[[Image: | [[Image:DetectomatProgrammingTool.png|left|thumb|200px]] After you clicked on Ok button, a new container appears. Now you should have meta informations from the Detectomat fire alarm system. You can get that from the DPT application. Select one of the control units, and click on File menu -> "Export to old data(*.prg + *.ktx)", and save these files. Do that on each control unit. | ||
<br style="clear: both" /> | <br style="clear: both" /> | ||
In Siwenoid there is a Detectomat menu, which contains "Create import file". It will convert these .prg and .ktx pairs to a valid Siwenoid metafile. When all of these file pairs are converted, in the tree structure rightclick on Detectomat's container, and select "Import from Metafile". Select one of the converted files. Now you should enter the ID of the control unit. If you use one unit alone, the ID will be 200. In other case it will be the panel's Bitbus ID. Do that with each converted metafiles. | |||
<br style="clear: both" /> | <br style="clear: both" /> | ||
Right click on the new container, and select "Enable communication". Now Siwenoid started to communicate with Detectomat fire alarm system.<br> | |||
<br style="clear: both" /> | <br style="clear: both" /> | ||
''Previous chapter-> [[ | ''Previous chapter-> [[Satel configuration]] / Next chapter-> [[SPC6xxx configuration]]'' | ||
[[Category:Commissioning]] | [[Category:Commissioning]] | ||
Latest revision as of 09:08, 7 January 2014
| Language: | English • magyar |
|---|
Previous chapter-> Satel configuration / Next chapter-> SPC6xxx configuration
Configuring Detectomat fire alarm system
Detectomat fire alarm systems can connect to Siwenoid through the standard RS232 programming port, or through the RS232 port of BMZ Master modul. Most of newer computers haven't got any serial (RS-232) connection. Thatswhy we need a TCP-IP to RS-232 converter. In this configuration tutorial, we use Lantronix and an ATC-1000 converter.
Connecting by ATC-1000
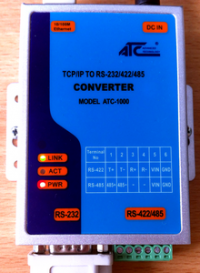
ATC-1000's default IP address is: 192.168.2.1 The default port is: 23.
We need to connect it to the computer, and type this ip address in a web browser.
To enter the configuration site enter the username and the password. (Default username: admin, password: system)
If it allowed to access, click on "UART" menu on the left side of the site. To setting up the connection between ATC-1000 and Detectomat fire alarm system, enter the following settings:
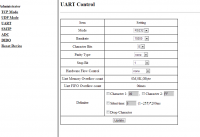
Mode: RS232
Baudrate: 9600
Character Bits: 8
Parity Type: none
Stop Bit: 1
Hardware Flow Control: none
On Delimiter, leave blank all checkboxes.

To set ATC-1000's IP address, click on "Administrator" menu on the left, and "System IP Configuration" menu. Enter the correct values you want to use.
To set the communication's port, click on "TCP Mode" menu. Enter the required port number to the "Data Port Number" field.
Note: Using DHCP, you should enter the IP host address in Siwenoid each time, when ATC-1000's IP address changed.
Use a standard RS232 cable to make connection between Detectomat fire alarm system and ATC-1000.
Connecting by Lantronix
To set up Lantronix please follow this guide: Lantronix configuration
Use this settings:
Baudrate: 9600
Character Bits: 8
Parity Type: none
Stop Bit: 1
Hardware Flow Control: none
Setting up the fire alarm system
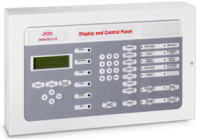
To enable communication with Detectomat fire alarm system, enter in System parameter settings on the panel. Select the parameter #16, and change the value to 6. It will enable the operation and display with new protocol.
Setting up in Siwenoid
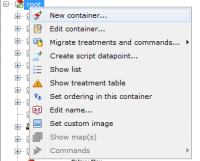
In Siwenoid Client, click on the Datapoint Hierarchy tree button. Right click on the root container, and select "New container" menu.
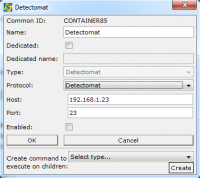
Enter a chosen name for Detectomat fire alarm system. Select "Detectomat" in the Type, and "Detectomat-ATC" in the Protocol dropdown list if you use the ATC-1000 converter, or "Detectomat" in other case.
The Host field must be the IP of the converter's IP address, just like on the Port field.
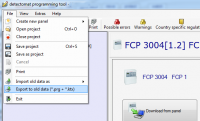
After you clicked on Ok button, a new container appears. Now you should have meta informations from the Detectomat fire alarm system. You can get that from the DPT application. Select one of the control units, and click on File menu -> "Export to old data(*.prg + *.ktx)", and save these files. Do that on each control unit.
In Siwenoid there is a Detectomat menu, which contains "Create import file". It will convert these .prg and .ktx pairs to a valid Siwenoid metafile. When all of these file pairs are converted, in the tree structure rightclick on Detectomat's container, and select "Import from Metafile". Select one of the converted files. Now you should enter the ID of the control unit. If you use one unit alone, the ID will be 200. In other case it will be the panel's Bitbus ID. Do that with each converted metafiles.
Right click on the new container, and select "Enable communication". Now Siwenoid started to communicate with Detectomat fire alarm system.
Previous chapter-> Satel configuration / Next chapter-> SPC6xxx configuration