Datapoint treatment: Difference between revisions
No edit summary |
mNo edit summary |
||
| Line 5: | Line 5: | ||
__TOC__ | __TOC__ | ||
Algorex datapoints are associated with treatment tables. These tables define the behavior of datapoints | Algorex datapoints are associated (linked) with treatment tables. These tables define the behavior of datapoints on different recieved statuses. | ||
<br style="clear: both" /> | |||
The behavior of datapoints can mean the following: | |||
* event category | * event category | ||
* eventlist color | * eventlist color | ||
| Line 12: | Line 13: | ||
* etc. | * etc. | ||
==Edit treatment== | ==Edit treatment== | ||
[[Image:Treat_popup_status_edit.png|left|frame]] Call the treatment table of a | [[Image:Treat_popup_status_edit.png|left|frame]] Call out the treatment table of a datapoint. Right-click on a status and select '''Edit treatment''' menu. | ||
<br style="clear: both" /> | <br style="clear: both" /> | ||
[[Image:Treat_edittreat_dialog.png|left|frame]] | [[Image:Treat_edittreat_dialog.png|left|frame]] | ||
Edit treatment dialog contains | The "Edit treatment" dialog contains the following treatment parameters: | ||
* Name of the treatment (en/hu): The name of a certain status in 2 languages. | * Name of the treatment (en/hu): The name of a certain status in 2 languages. | ||
* Handler type: don't change | * Handler type: don't change | ||
* Datapoint type: don't change | * Datapoint type: don't change | ||
* Bitmask: binary value. It determines the order of datapoints on treatment table and | * Bitmask: binary value. It determines the order of datapoints on treatment table and works as a status ID. It is binary because it is used in bitmask operations. | ||
* Category: set the event category of a certain status. | * Category: set the event category of a certain status. | ||
* Blinking: actually it has no | * Blinking: actually it has no effect. | ||
* Color: color | * Color: The color doessn't have to be the same as the color of the associated category. The color of the status in the event list can be set here. | ||
* Effect mask: In | * Effect mask: In most cases a new status override the old one. If the datapoint aquires the selected statuses are cleared form the selection box. | ||
* Command mask: | * Command mask: Commands can be enabled/disabled in relation of the specific status. | ||
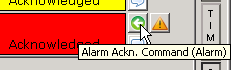
* Default command: | * Default command: The default command associated with the button depends on what command is the most likely to be set at the current status.[[Image:Eventlist_call_defcommand.png|right|frame]] | ||
* Handler specific parameters: don't change. | * Handler specific parameters: don't change. | ||
'''Important:''' | '''Important:''' | ||
* | * Changing the treatment parameters will change the treatment table of all datapoints with the same type. | ||
* | * In some casees you have to log out then log in again for the modifications to take effect. | ||
<br style="clear: both" /> | <br style="clear: both" /> | ||
| Line 36: | Line 37: | ||
[[Image:Treat_table_edit_datap.png|left|frame]] On the treatment table of a datapoint click on the '''Edit datapoint''' button. | [[Image:Treat_table_edit_datap.png|left|frame]] On the treatment table of a datapoint click on the '''Edit datapoint''' button. | ||
<br style="clear: both" /> | <br style="clear: both" /> | ||
[[Image:Treat_edit_datap_dialog.png|left|frame]] The | [[Image:Treat_edit_datap_dialog.png|left|frame]] The opened dialog contains some information on datapoint. "Type" field contains the ID of its treatment table. If you want this datapoint to behave differently from others then type in a new ID number (what even can be negative number). Be consistent with the previous settings upon creating new treatments. | ||
Click on the "Create type" button. The original treatment will be copied into a new one. Now your datapoint behave according to this treatment. | |||
Then details of the new treatment can be edited as it was described in previous section. | Then details of the new treatment can be edited as it was described in the previous section. | ||
Already created treatment types can be used for the new datapoints by typing its ID in the "type" field. | |||
<br style="clear: both" /> | <br style="clear: both" /> | ||
Revision as of 13:57, 5 October 2016
| Language: | English • magyar |
|---|
Previous chapter-> Datapoint settings / Next chapter-> Create map
Algorex datapoints are associated (linked) with treatment tables. These tables define the behavior of datapoints on different recieved statuses.
The behavior of datapoints can mean the following:
- event category
- eventlist color
- name of status
- etc.
Edit treatment

Call out the treatment table of a datapoint. Right-click on a status and select Edit treatment menu.

The "Edit treatment" dialog contains the following treatment parameters:
- Name of the treatment (en/hu): The name of a certain status in 2 languages.
- Handler type: don't change
- Datapoint type: don't change
- Bitmask: binary value. It determines the order of datapoints on treatment table and works as a status ID. It is binary because it is used in bitmask operations.
- Category: set the event category of a certain status.
- Blinking: actually it has no effect.
- Color: The color doessn't have to be the same as the color of the associated category. The color of the status in the event list can be set here.
- Effect mask: In most cases a new status override the old one. If the datapoint aquires the selected statuses are cleared form the selection box.
- Command mask: Commands can be enabled/disabled in relation of the specific status.
- Default command: The default command associated with the button depends on what command is the most likely to be set at the current status.
- Handler specific parameters: don't change.

Important:
- Changing the treatment parameters will change the treatment table of all datapoints with the same type.
- In some casees you have to log out then log in again for the modifications to take effect.
Create a treatment

On the treatment table of a datapoint click on the Edit datapoint button.

The opened dialog contains some information on datapoint. "Type" field contains the ID of its treatment table. If you want this datapoint to behave differently from others then type in a new ID number (what even can be negative number). Be consistent with the previous settings upon creating new treatments.
Click on the "Create type" button. The original treatment will be copied into a new one. Now your datapoint behave according to this treatment.
Then details of the new treatment can be edited as it was described in the previous section.
Already created treatment types can be used for the new datapoints by typing its ID in the "type" field.
Previous chapter-> Datapoint settings / Next chapter-> Create map