Backup restore: Difference between revisions
No edit summary |
|||
| (43 intermediate revisions by the same user not shown) | |||
| Line 5: | Line 5: | ||
__TOC__ | __TOC__ | ||
== | ==Restoring server and database from backup== | ||
===Before restore=== | |||
If you want to restore the application from a [[Safety_backup]] (f.e. after PC change, reinstall) first you have to do is make a clean install of the software. ( → [[Express_installation]] or [[Manual_installation]]). | |||
<br /> | |||
After a clean install you have to start the installer again. On the first page you'll see:<br /> | |||
Try to use mouse when it's possible and don't click on button's twice. | |||
For security reasons there are no "BACK" buttons in the installer, so every time you click "next" make sure that everything is selected / filled correctly. You can start over the process any time. | |||
<br style="clear: both" /> | |||
[[Image:Restore1.jpg|left|thumb| | ===Server application restore process=== | ||
First you have to restore the server application. If your backup is made from older version of the software than the installation package has - no worries. The backup contains the necessary core files, so the restored application will be the same version as the backupped. ( For upgrading the softwer's version see [[Version upgrades]]) | |||
[[Image:Restore1.jpg|left|thumb|400px]] Here you should select "Restore" and then click "Next >>". | |||
<br style="clear: both" /> | <br style="clear: both" /> | ||
---- | |||
[[Image:Restore2.jpg|left|thumb| | [[Image:Restore2.jpg|left|thumb|400px]] Select server application to restore and then click "Next >>". | ||
<br style="clear: both" /> | <br style="clear: both" /> | ||
---- | |||
[[Image:Restore3.jpg|left|thumb| | [[Image:Restore3.jpg|left|thumb|400px]] Select the components of server application then click "Next >>". | ||
<br />''Don't change the checked boxes, unless you absolutely sure of what you are doing.'' | |||
<br style="clear: both" /> | <br style="clear: both" /> | ||
---- | |||
[[Image:Source. | [[Image:Source.JPG|left|thumb|400px]] Select the source '''zip file''' of the server backup. Use "Browse..." to select source folder and file.<br /> | ||
''The backupped server files named "Server"+>DATE of backup<.zip". (For example '''server_20161011_1230.zip''') You should '''select the zip file''', not its folder'' | |||
<br style="clear: both" /> | <br style="clear: both" /> | ||
---- | |||
[[Image:Restore5.jpg|left|thumb|400px]] Select '''destination folder'''. Use "Browse..." to select or create destination folder.<br /> | |||
''By default it is located under c:\users\(windows username)\Siwenoid\server'' | |||
* The windows user name (and folder name under "users" should not contain any special chars (like "űáéúőóö") exept the english alfabet, and no spaces to avoid surprises. | |||
* The destination folder is "'''...siwenoid/server'''", not just "Siwenoid" | |||
<br style="clear: both" /> | <br style="clear: both" /> | ||
---- | |||
====Restoring server's database from backup ==== | |||
[[Image:Tesztttt.png|left|thumb|400px]] | |||
In the '''upper section''' you should define database, what the software will use. | |||
''The pre-filled data is obtained from the backup file. It not recommended to change the default values)'' | |||
;URL: | |||
: the URL of Siwenoid's Mysql server. | |||
** Since the server is installed on that computer, it should be 127.0.0.1 | |||
** Watch for the port number, by default it's 3399 | |||
;Database name: | |||
: This data is obtained from the backup. A new database will be created by this name. '''Any name''' can be entered here, but it's '''not recommended to change''' the default values. | |||
;Owner: | |||
: Here you must provide a '''non-root database user''' what have the permission to create tables in the main database | |||
;Password | |||
: The password of the database user. | |||
* The database users are created upon installation. It is not recommended to change the default values upon insatallation. If the backup contains different usernames and passwords than what the installer created previously then the restore process will not succeed. | |||
<br /><br /> | |||
In the '''lower section''' you should give the credentials of the '''root''' database user. | |||
;Database name | |||
: Name of the main database, usually '''mysql''' with all lowercase chars. | |||
;Username | |||
: Mysql user with root access. Usually '''root''' | |||
;Password | |||
: The password of the root database user. | |||
<br /><br /> | |||
If everything filled correctly click on '''Test connection'''. You should make changes if anything other than "test was successful" pops up. | |||
Only click "Next >>" if the test is OK, or you'll have to start over the whole restore process. | |||
<br style="clear: both" /> | <br style="clear: both" /> | ||
---- | |||
[[Image: | [[Image:RestorePath.png|left|thumb|400px]] | ||
;Path to database backup | |||
: Enter the full path to the database backup. | |||
* The database backup is usually named "database+>date of backup<". Like ''database_20161011_1230.zip''. | |||
* Select the zip file itself, not just its folder. | |||
;Path to mysql utility | |||
: Siwenoid installs its own mysql, usually under ''c:\users\(windows username)\Mysql''. Brows for the '''Mysql\bin''' folder and select '''mysql.exe''' | |||
If those are selected, click "Next >>" | |||
<br style="clear: both" /> | <br style="clear: both" /> | ||
---- | |||
[[Image:Restore8.jpg|left|thumb| | [[Image:Restore8.jpg|left|thumb|400px]] If everything went OK, a progress bar shows you how far the restore is got. After finished (100%) the installer asks if you want to update the configuration xml files for Siwenoid. Unless you have a specific reason '''click Yes'''. | ||
<br style="clear: both" /> | <br style="clear: both" /> | ||
---- | |||
[[Image: | [[Image:RestureFinish.png|left|thumb|400px]] Click "Finish". Your Siwenoid Server is restored to a backupped version! | ||
<br style="clear: both" /> | <br style="clear: both" /> | ||
---- | |||
==Restore client application== | |||
After the server's restoration you should restore the client application. | |||
* The process is almost the same as with the server, but at the beginning you should select '''Siwenoid client application''' instead of "server". | |||
(Detailed description coming soon) | |||
''Previous chapter-> [[Config file parameters]] / Next chapter-> [[Version upgrades]]'' | ''Previous chapter-> [[Config file parameters]] / Next chapter-> [[Version upgrades]]'' | ||
Latest revision as of 07:05, 23 August 2019
| Language: | English • magyar |
|---|
Previous chapter-> Config file parameters / Next chapter-> Version upgrades
Restoring server and database from backup
Before restore
If you want to restore the application from a Safety_backup (f.e. after PC change, reinstall) first you have to do is make a clean install of the software. ( → Express_installation or Manual_installation).
After a clean install you have to start the installer again. On the first page you'll see:
Try to use mouse when it's possible and don't click on button's twice.
For security reasons there are no "BACK" buttons in the installer, so every time you click "next" make sure that everything is selected / filled correctly. You can start over the process any time.
Server application restore process
First you have to restore the server application. If your backup is made from older version of the software than the installation package has - no worries. The backup contains the necessary core files, so the restored application will be the same version as the backupped. ( For upgrading the softwer's version see Version upgrades)
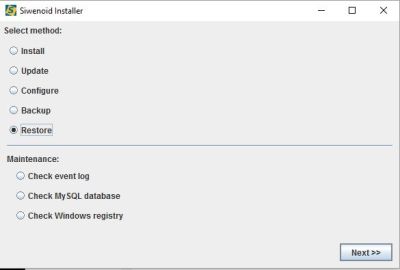
Here you should select "Restore" and then click "Next >>".
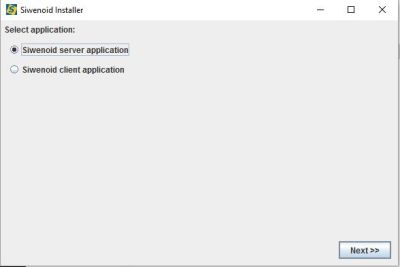
Select server application to restore and then click "Next >>".
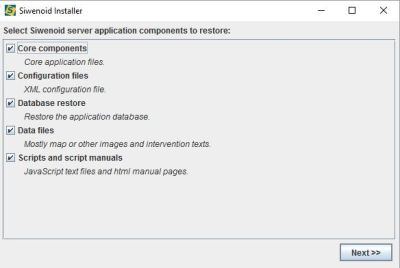
Select the components of server application then click "Next >>".
Don't change the checked boxes, unless you absolutely sure of what you are doing.
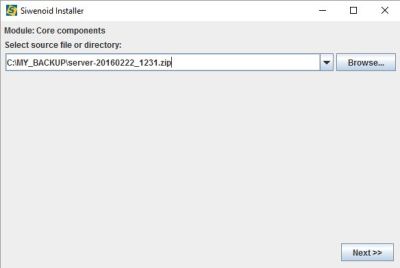
Select the source zip file of the server backup. Use "Browse..." to select source folder and file.
The backupped server files named "Server"+>DATE of backup<.zip". (For example server_20161011_1230.zip) You should select the zip file, not its folder
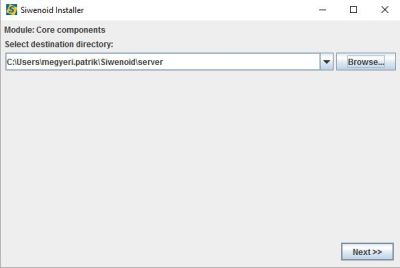
Select destination folder. Use "Browse..." to select or create destination folder.
By default it is located under c:\users\(windows username)\Siwenoid\server
- The windows user name (and folder name under "users" should not contain any special chars (like "űáéúőóö") exept the english alfabet, and no spaces to avoid surprises.
- The destination folder is "...siwenoid/server", not just "Siwenoid"
Restoring server's database from backup
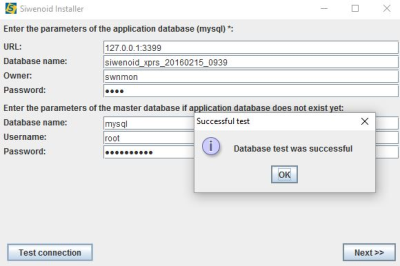
In the upper section you should define database, what the software will use. The pre-filled data is obtained from the backup file. It not recommended to change the default values)
- URL
- the URL of Siwenoid's Mysql server.
- Since the server is installed on that computer, it should be 127.0.0.1
- Watch for the port number, by default it's 3399
- Database name
- This data is obtained from the backup. A new database will be created by this name. Any name can be entered here, but it's not recommended to change the default values.
- Owner
- Here you must provide a non-root database user what have the permission to create tables in the main database
- Password
- The password of the database user.
- The database users are created upon installation. It is not recommended to change the default values upon insatallation. If the backup contains different usernames and passwords than what the installer created previously then the restore process will not succeed.
In the lower section you should give the credentials of the root database user.
- Database name
- Name of the main database, usually mysql with all lowercase chars.
- Username
- Mysql user with root access. Usually root
- Password
- The password of the root database user.
If everything filled correctly click on Test connection. You should make changes if anything other than "test was successful" pops up.
Only click "Next >>" if the test is OK, or you'll have to start over the whole restore process.
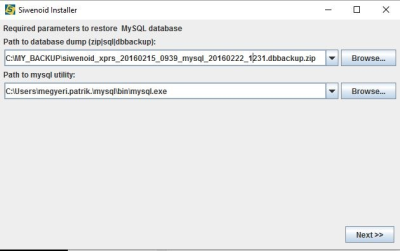
- Path to database backup
- Enter the full path to the database backup.
- The database backup is usually named "database+>date of backup<". Like database_20161011_1230.zip.
- Select the zip file itself, not just its folder.
- Path to mysql utility
- Siwenoid installs its own mysql, usually under c:\users\(windows username)\Mysql. Brows for the Mysql\bin folder and select mysql.exe
If those are selected, click "Next >>"
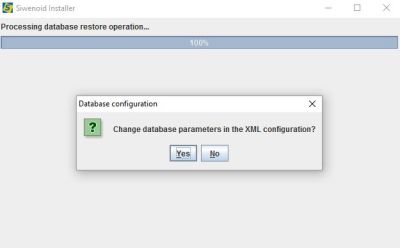
If everything went OK, a progress bar shows you how far the restore is got. After finished (100%) the installer asks if you want to update the configuration xml files for Siwenoid. Unless you have a specific reason click Yes.
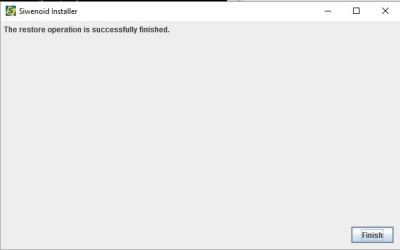
Click "Finish". Your Siwenoid Server is restored to a backupped version!
Restore client application
After the server's restoration you should restore the client application.
- The process is almost the same as with the server, but at the beginning you should select Siwenoid client application instead of "server".
(Detailed description coming soon)
Previous chapter-> Config file parameters / Next chapter-> Version upgrades