Siwenoid v2 INIM PrevidiaMax Modbus configuration: Difference between revisions
(draft 4) |
(draft 5) |
||
| Line 1: | Line 1: | ||
{{Languages|Siwenoid v2 INIM PrevidiaMax Modbus configuration}} | {{Languages|Siwenoid v2 INIM PrevidiaMax Modbus configuration}} | ||
===Siwenoid container | ===Siwenoid container parameters:=== | ||
[[File:Inim previdiamax container en.png|400px]] | [[File:Inim previdiamax container en.png|400px]] | ||
| Line 16: | Line 16: | ||
===PrevidiaMax Modbus settings:=== | ===PrevidiaMax Modbus settings:=== | ||
[[File:previdia-studio-en-1.png|400px]] [[File:previdia-studio-en-2.png|400px]] [[File:previdia-studio-en-3.png|400px]] [[File:previdia-studio-en-4.png|400px]] [[File:previdia-studio-en-5.png|400px]] | [[File:previdia-studio-en-1.png|400px]] [[File:previdia-studio-en-2.png|400px]] [[File:previdia-studio-en-3.png|400px]] [[File:previdia-studio-en-4.png|400px]] [[File:previdia-studio-en-5.png|400px]] [[File:previdia-studio-en-6.png|400px]] | ||
<div style="line-height: 1.6;"> | |||
<span style="font-size: 1em;">1. Navigate to the PANEL DISPLAY section in PREVIDIA-STUDIO as shown on the first 3 images.</span><br> | |||
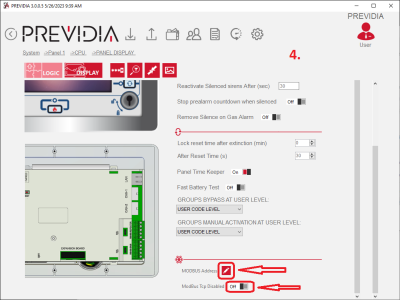
<span style="font-size: 1em;">2. Make sure the option 'Modbus Tcp Disabled' is set to <span style="color: blue;">Off</span> as shown on the 4th image.</span><br> | |||
<span style="font-size: 1em;">3. Click on the MODBUS Address edit sign. (Shown at the bottom of the 4th image)</span><br> | |||
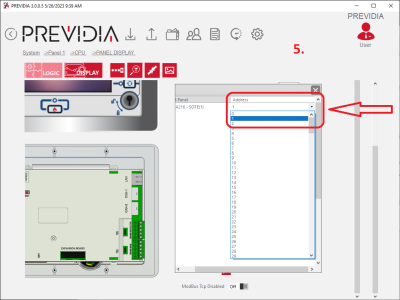
<span style="font-size: 1em;">4. Set the same Modbus address in the dropdown box (shown on the 5th image) that is set in the Siwenoid INIM PrevidiaMax container parameters.</span><br> | |||
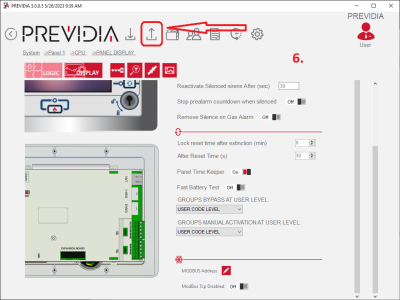
<span style="font-size: 1em;">5. Download (write) the changes to the INIM PrevidiaMax panel. (Shown on the 6th image)</span><br> | |||
</div> | |||
Revision as of 09:56, 16 October 2023
| Language: | English • magyar |
|---|
Siwenoid container parameters:
Parameters:
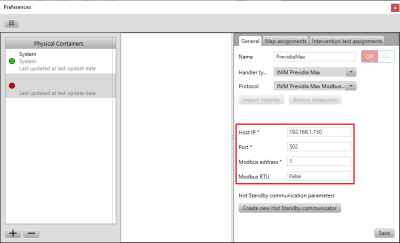
Host IP: The IP address or hostname where the INIM PrevidiaMax panel can be found on the network.
Port: In the case of direct ethernet connection the port number is 502. In the case of using an RS232 to TCP IP Converter, the port number can be configured in the TCP server parameters of the converter's settings.
Modbus address: The Modbus address of the PrevidiaMax panel can be set in the programming software of the panel called PREVIDIA-STUDIO. (See PrevidiaMax Modbus settings below)
Modbus RTU: In the case of direct ethernet connection the value has to be set to false, in the case of using an RS232 to TCP IP Converter the value has to be set to true.
PrevidiaMax Modbus settings:
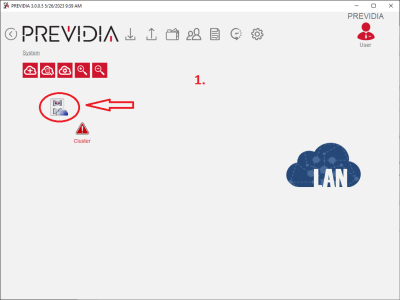
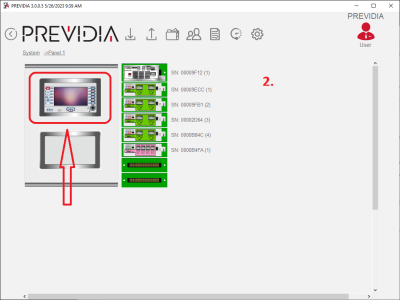
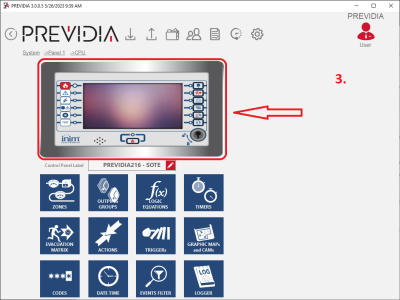
1. Navigate to the PANEL DISPLAY section in PREVIDIA-STUDIO as shown on the first 3 images.
2. Make sure the option 'Modbus Tcp Disabled' is set to Off as shown on the 4th image.
3. Click on the MODBUS Address edit sign. (Shown at the bottom of the 4th image)
4. Set the same Modbus address in the dropdown box (shown on the 5th image) that is set in the Siwenoid INIM PrevidiaMax container parameters.
5. Download (write) the changes to the INIM PrevidiaMax panel. (Shown on the 6th image)
