DVR-NVR connections: Difference between revisions
(Created page with "''Previous chapter-> Running Siwenix / Next chapter-> Siwenix user interface'' __TOC__ A rögzítőkkel (DVR és NVR) a Siwenix...") |
No edit summary |
||
| (3 intermediate revisions by the same user not shown) | |||
| Line 1: | Line 1: | ||
<b>Language</b> | ''Magyar: [[Kapcsolatok_(DVR-NVR)]]'' | |||
''Previous chapter-> [[Running Siwenix|Running Siwenix]] / Next chapter-> [[Siwenix user interface|Siwenix user interface]]'' | ''Previous chapter-> [[Running Siwenix|Running Siwenix]] / Next chapter-> [[Siwenix user interface|Siwenix user interface]]'' | ||
__TOC__ | __TOC__ | ||
The Siwenix communicates with the recorders (DVR and NVR) only through TCP-IP protocol. This requires that the recorders are properly configured (especially Network and Users). For more information check the documentation of the recorder. | The Siwenix communicates with the recorders (DVR and NVR) only through TCP-IP protocol. This requires that the recorders are properly configured (especially Network and Users). For more information check the documentation of the recorder. | ||
==Setting up connection== | ==Setting up connection== | ||
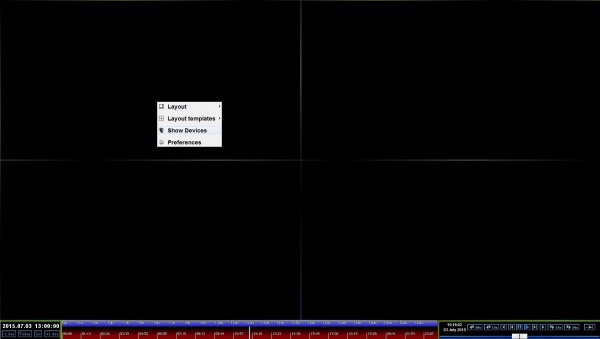
From the main menu (right click on the main screen) choose the Show Devices button. If you click on it on the left side of the window appears the device list. Here if you click on the Add button and choose the Add Device from the pop-up window, | [[Image:Setting up connection en.jpg|left|thumb|600px]] | ||
From the main menu (right click on the main screen) choose the Show Devices button. If you click on it on the left side of the window appears the device list. | |||
<br style="clear: both" /> | |||
[[Image:Setting up connection2 en.jpg|left|thumb|600px]] | |||
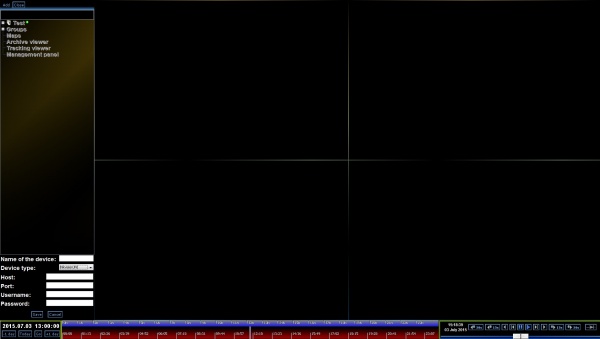
Here if you click on the Add button and choose the Add Device from the pop-up window, at the bottom of the list appears an editing window, where you can create a recorder reference by filling in a form with the needed information. | |||
<br style="clear: both" /> | |||
[[Image:Setting up connection3 en.jpg|left|thumb|600px]] | |||
After clicking Save, Siwenix automatically tries to connect to the recorder, and if it's successful it gets all the avalaible channels. | |||
<br style="clear: both" /> | |||
==Connection state== | ==Connection state== | ||
In the device list next to the devices name a little icon shows the state of the connection. | In the device list next to the devices name a little icon shows the state of the connection. | ||
This can be: | This can be: | ||
[[Image:Connection state red.jpg|left|thumb|200px]] | |||
*Red: The connections external service is not running | *Red: The connections external service is not running | ||
<br style="clear: both" /> | |||
[[Image:Connection state orange.jpg|left|thumb|200px]] | |||
*Orange: The connections external service is started | *Orange: The connections external service is started | ||
<br style="clear: both" /> | |||
[[Image:Connection state yellow.jpg|left|thumb|200px]] | |||
*Yellow: The connection is live, logging into the recorders services | *Yellow: The connection is live, logging into the recorders services | ||
<br style="clear: both" /> | |||
[[Image:Connection state green.JPG|left|thumb|200px]] | |||
*Green: The connection is live, ready to use | *Green: The connection is live, ready to use | ||
<br style="clear: both" /> | |||
Latest revision as of 09:32, 8 December 2015
Language | Magyar: Kapcsolatok_(DVR-NVR)
Previous chapter-> Running Siwenix / Next chapter-> Siwenix user interface
The Siwenix communicates with the recorders (DVR and NVR) only through TCP-IP protocol. This requires that the recorders are properly configured (especially Network and Users). For more information check the documentation of the recorder.
Setting up connection

From the main menu (right click on the main screen) choose the Show Devices button. If you click on it on the left side of the window appears the device list.

Here if you click on the Add button and choose the Add Device from the pop-up window, at the bottom of the list appears an editing window, where you can create a recorder reference by filling in a form with the needed information.

After clicking Save, Siwenix automatically tries to connect to the recorder, and if it's successful it gets all the avalaible channels.
Connection state
In the device list next to the devices name a little icon shows the state of the connection. This can be:

- Red: The connections external service is not running

- Orange: The connections external service is started

- Yellow: The connection is live, logging into the recorders services

- Green: The connection is live, ready to use